Installing LLM Brand Monitor MCP
This guide walks you through connecting the LLM Brand Monitor (LBM) MCP server to popular AI assistants and developer tools. Once connected, you can manage brand-monitoring projects, run scans across 350+ LLMs, and analyze results with natural-language commands.
Table of contents
- Introduction
- Which version should I use — HTTP or stdio?
- Getting your credentials
- HTTP (remote) installation
- stdio (local) installation
- Verifying the connection
- Troubleshooting
Introduction
The LLM Brand Monitor MCP server exposes 17 tools that let any Model Context Protocol–compatible client talk to the LBM platform. You can ask the assistant to list projects, start scans, fetch transcripts, compare competitor mentions, and check your credit balance — all in plain English (or any other language the model speaks).
The server ships in two flavors:
| Flavor | Where it runs | How auth works | Best for |
|---|---|---|---|
| HTTP (remote) | Hosted by Serpstat at https://mcp.llmbrandmonitor.com/mcp | OAuth 2.1 + PKCE via Ory Hydra — you sign in through a browser, the client receives a JWT | Cloud assistants that cannot execute local processes (ChatGPT, Claude Web) |
| stdio (local) | A Node.js process started by your client on your own machine | Plain LBM_API_KEY from your LBM profile | Desktop apps and CLIs that can spawn local subprocesses (Claude Desktop, Claude Code, Codex, Gemini CLI, OpenClaw) |
Which version should I use — HTTP or stdio?
Use HTTP when:
- Your client is a hosted web app (ChatGPT, Claude Web) that has no way to launch a local process.
- You don’t want to install Node.js locally or paste your API key into a config file.
- You want browser-based sign-in with the same Google/email account you already use on
llmbrandmonitor.com. - You want zero-maintenance updates — the server is upgraded centrally.
Use stdio when:
- Your client is a desktop or terminal app that spawns subprocesses (Claude Desktop, Claude Code, Codex, Gemini CLI, OpenClaw, Cursor, Windsurf).
- You prefer a long-lived API key over OAuth flows.
- You’re working offline-friendly or behind a corporate proxy where browser-based OAuth is awkward.
- You want to pin a specific MCP server version, or run a fork/local build.
If you’re still not sure: HTTP is the lowest-friction path for end users; stdio gives you more control and is the only option for developer tools.
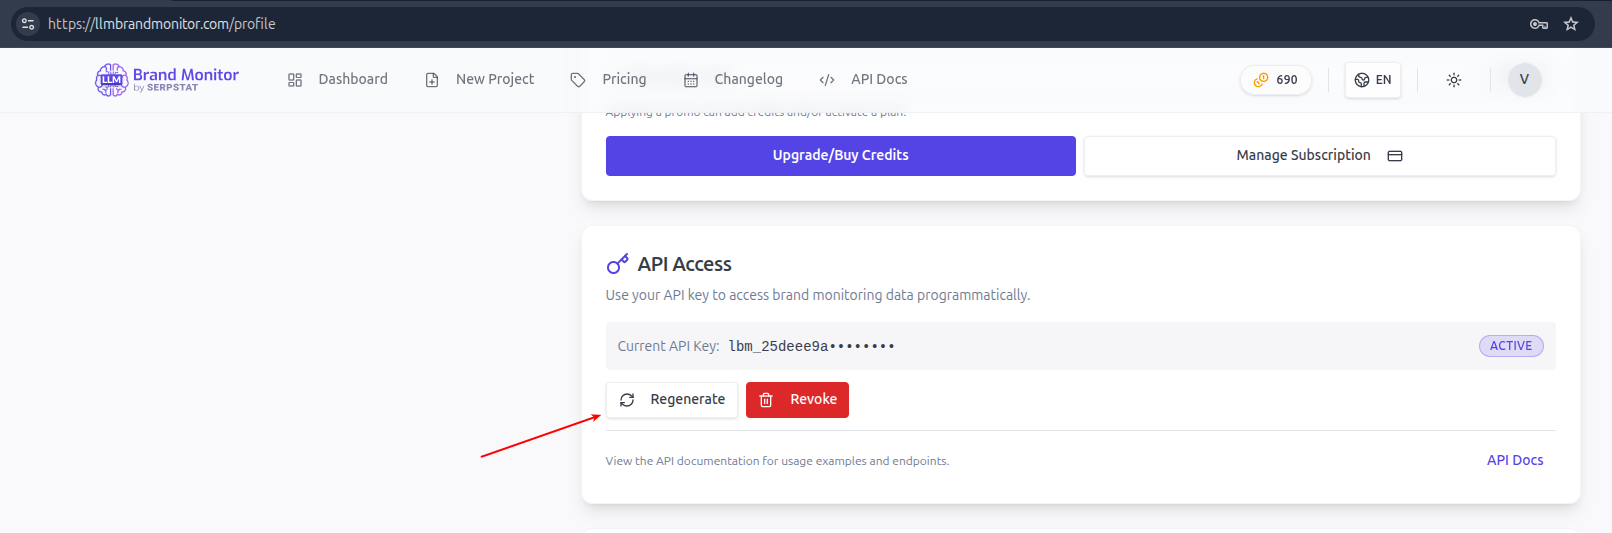
Getting your credentials
Both versions start from the same place — an account on llmbrandmonitor.com with an active billing setup.
[!IMPORTANT] MCP access requires a paid subscription or Pay-as-you-go. The free tier does not include API/MCP access. Pick a plan at https://llmbrandmonitor.com/pricing before continuing — on a free plan every tool call will fail with
UNAUTHORIZED(the API key is rejected because the plan isn’t whitelisted), and once a paid plan runs out of credits calls fail withINSUFFICIENT_CREDITS.
- Sign up or log in at https://llmbrandmonitor.com.
- Activate a subscription plan or enable Pay-as-you-go at https://llmbrandmonitor.com/pricing.
- Open your profile page.
- For stdio: copy your API key (it starts with
lbm_). - For HTTP: no key is needed — you’ll authorize the connection in the browser the first time you use it.
HTTP (remote) installation
The hosted server lives at:
https://mcp.llmbrandmonitor.com/mcp
You don’t need to install or run anything locally — just paste this URL into your client and complete OAuth.
ChatGPT
Available in ChatGPT plans that support MCP Apps (Plus, Pro, Business, Enterprise). The exact menu names may shift slightly as OpenAI iterates on the UI.
-
Open ChatGPT and click your avatar → Settings.
-
Go to Apps (in some plans you may need to enable developer/MCP apps under Beta features first), then click Create app in the top-right corner.

In Settings → Apps you’ll see any apps you’ve already enabled. Click Create app to add LBM.
-
Fill in the New App form:
- Name:
LLM Brand Monitor - Description (optional):
Track brand visibility in LLMs - MCP Server URL:
https://mcp.llmbrandmonitor.com/mcp - Authentication:
OAuth - Leave Client ID / Secret empty — the server uses Dynamic Client Registration, so ChatGPT will register itself automatically.
- Tick I understand and want to continue under the “Custom MCP servers introduce risk” warning, then click Create.
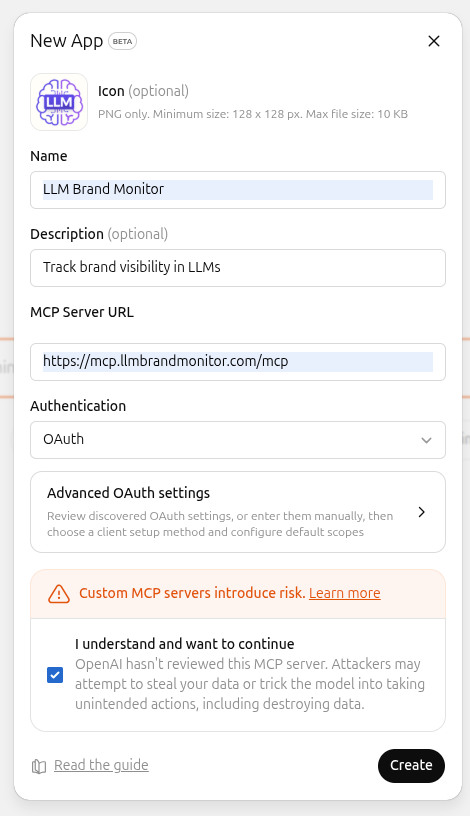
Filled-in form. The risk warning is standard for any custom MCP server — ChatGPT shows it for every third-party app.
- Name:
-
ChatGPT opens a browser tab on
llmbrandmonitor.com. Sign in if you’re not already logged in. -
On the consent screen, review the requested scopes (
projects:read,projects:write,scans:read,scans:write,results:read,usage:read,offline_access) and click Allow.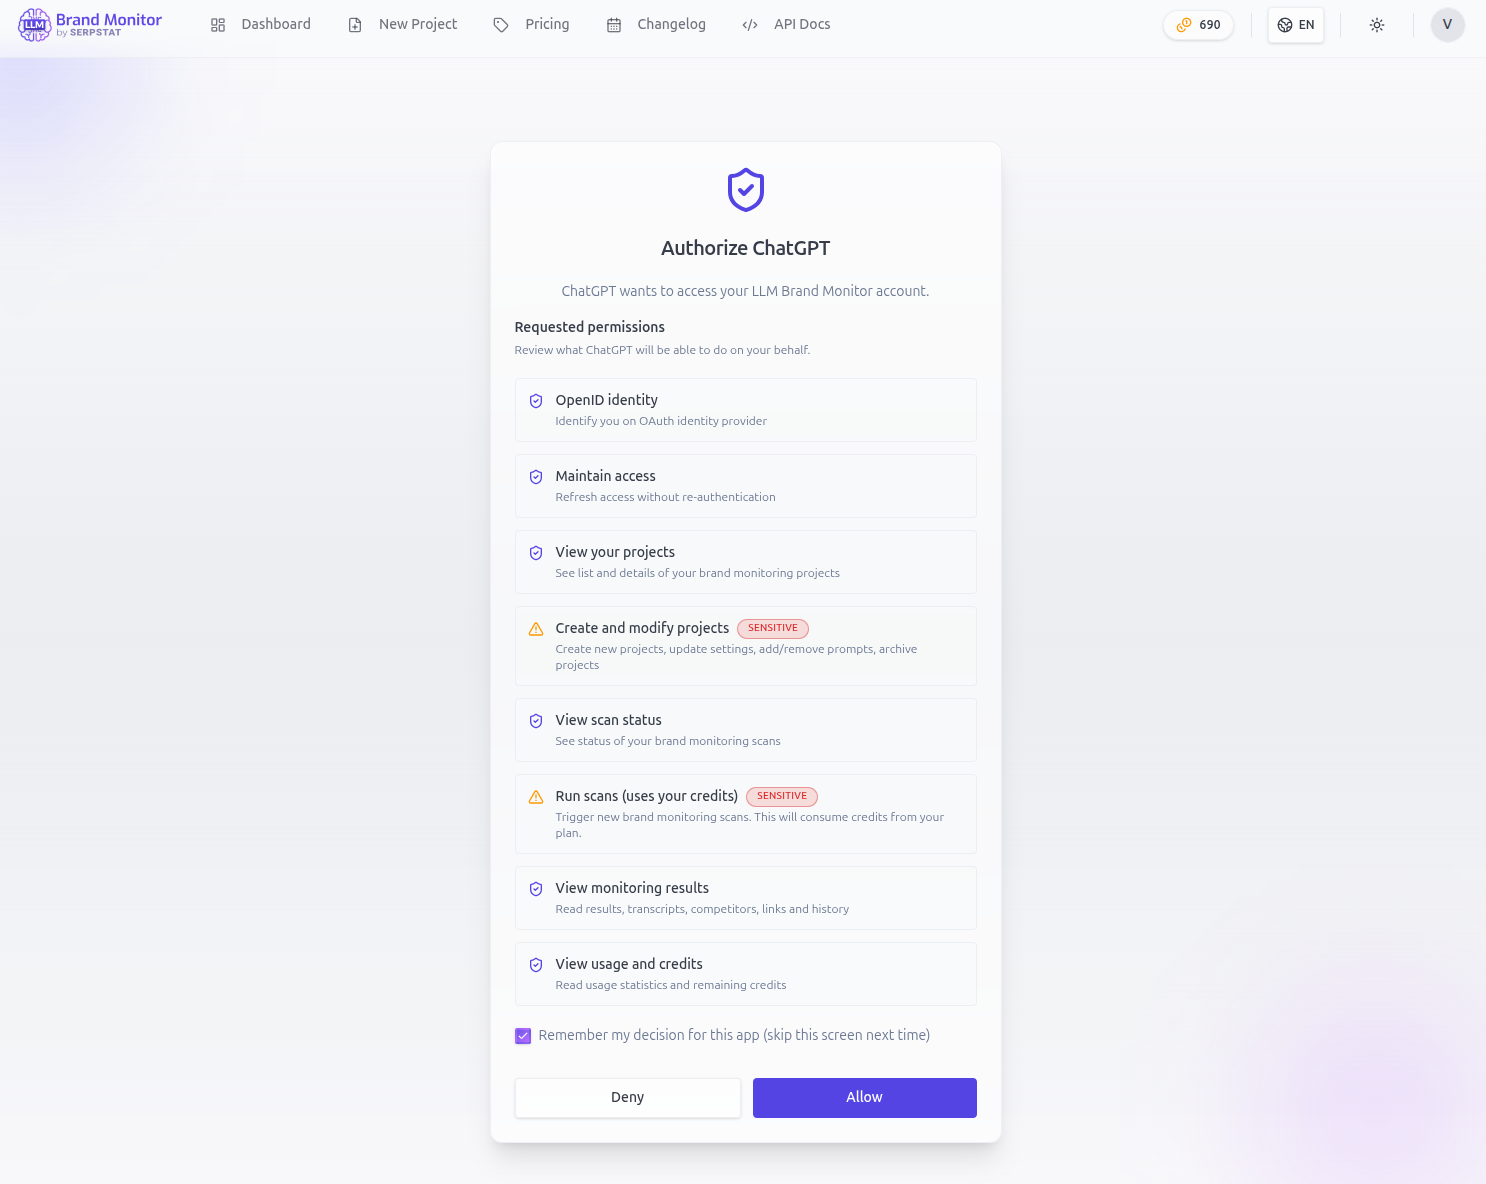
The consent page is hosted on
llmbrandmonitor.com. Tick Remember my decision if you don’t want to re-authorize on every new ChatGPT session. -
You’re redirected back to ChatGPT — the app now shows as Connected. Start a new chat and enable the app for that conversation: click the + in the composer → More → tick LLM Brand Monitor.
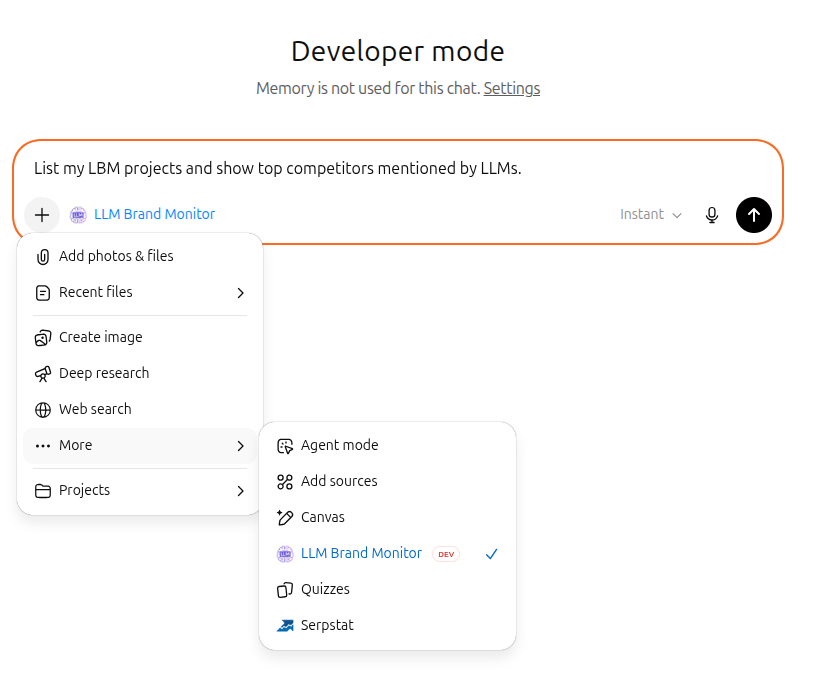
Once ticked, the app name appears next to the + icon and stays active for the rest of that conversation.
-
Send a prompt — ChatGPT will call the LBM tools and answer with live data from your account.
Example output: ChatGPT lists your projects and the top competitors LLMs mention for each one. The “Called tool” chips show every MCP call ChatGPT made — click them to see raw tool input/output.
Claude Web (claude.ai)
-
Open https://claude.ai and sign in.
-
Click your avatar → Settings → Connectors (in some regions the section is labeled Integrations). Scroll to the bottom of the list and click Add custom connector.
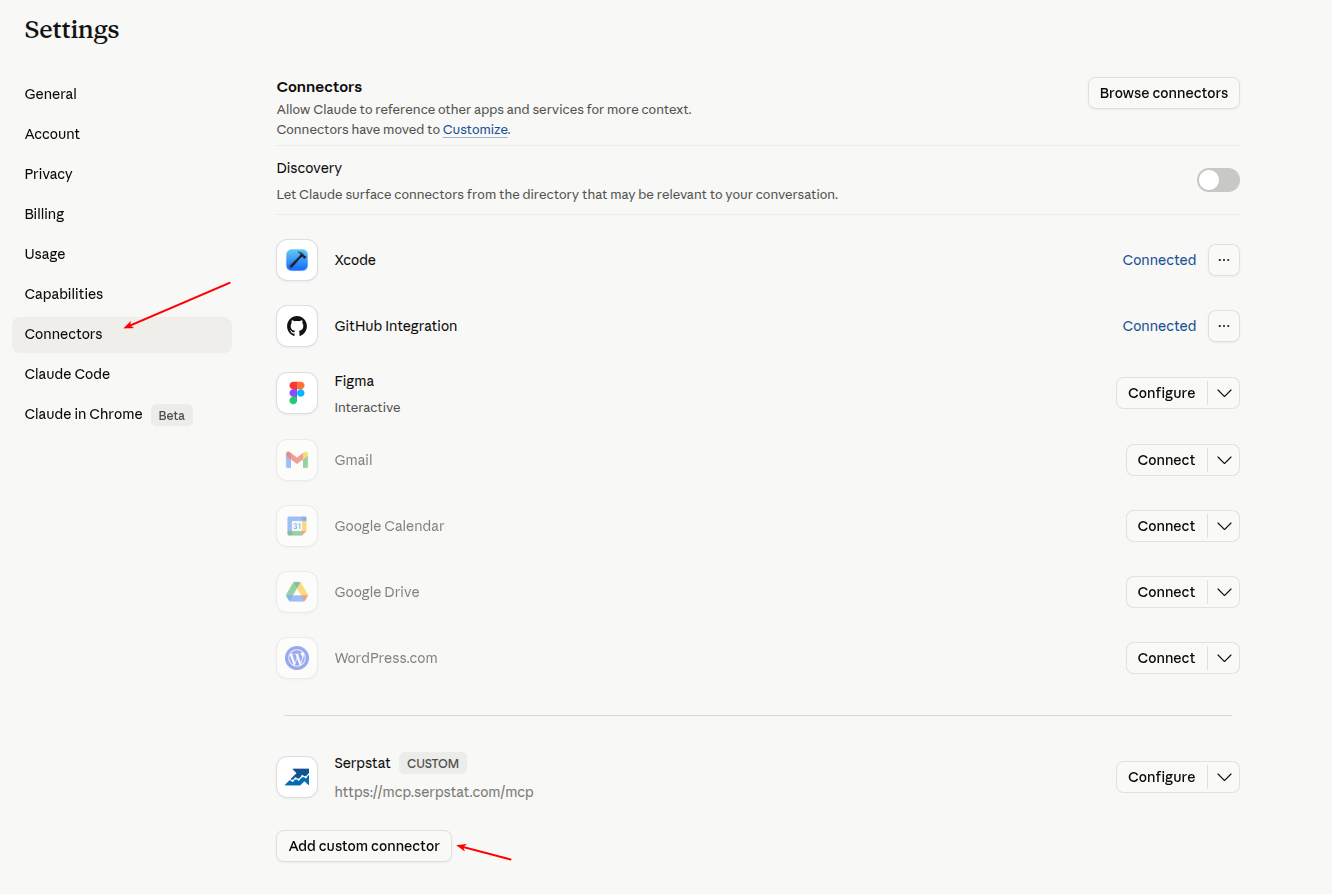
The Connectors page lists everything Claude can already talk to. The Add custom connector button at the very bottom is what you want for LBM.
-
Fill in the Add custom connector dialog:
- Name:
LLM Brand Monitor - Remote MCP server URL:
https://mcp.llmbrandmonitor.com/mcp - Leave Advanced settings collapsed — Claude discovers OAuth automatically via Dynamic Client Registration.
- Click Add.
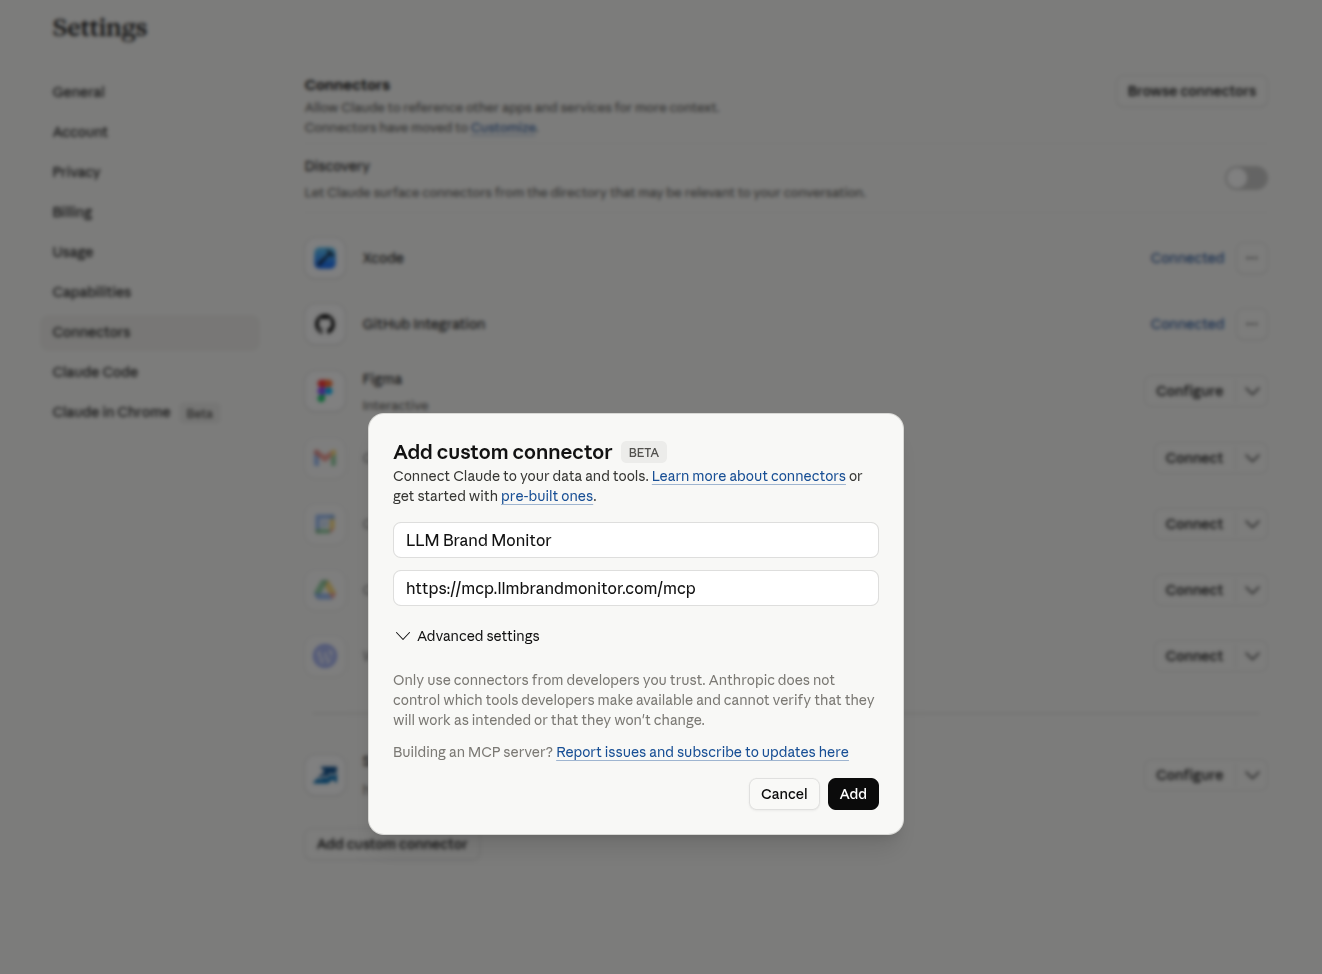
Filled-in form. Anthropic surfaces the standard “Only use connectors from developers you trust” notice — same warning, slightly different wording from ChatGPT.
- Name:
-
Claude opens a browser tab on
llmbrandmonitor.com. Sign in if you’re not already logged in, then review the requested scopes on the consent screen and click Allow.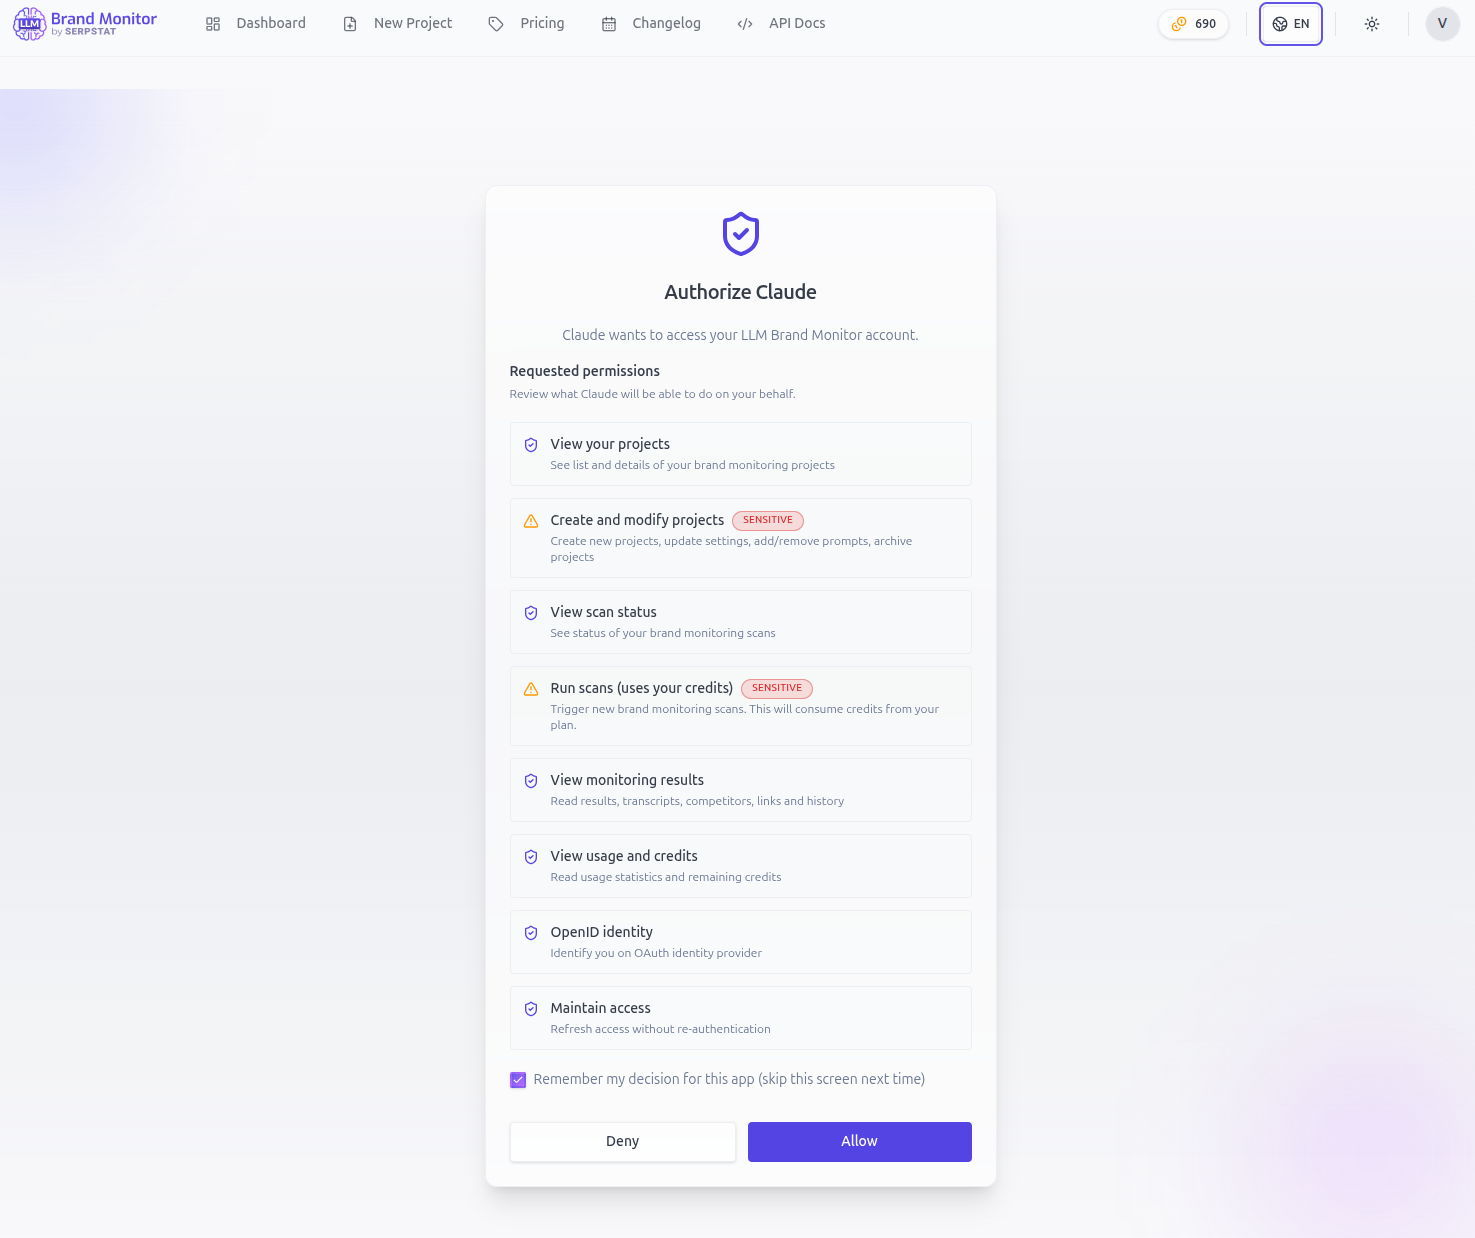
The consent page is the same one ChatGPT users see — just with “Authorize Claude” at the top. Tick Remember my decision to skip this on subsequent reconnects.
-
You’re redirected back to claude.ai. Claude shows a Tool permissions panel where you can decide upfront when each tool is allowed to run.
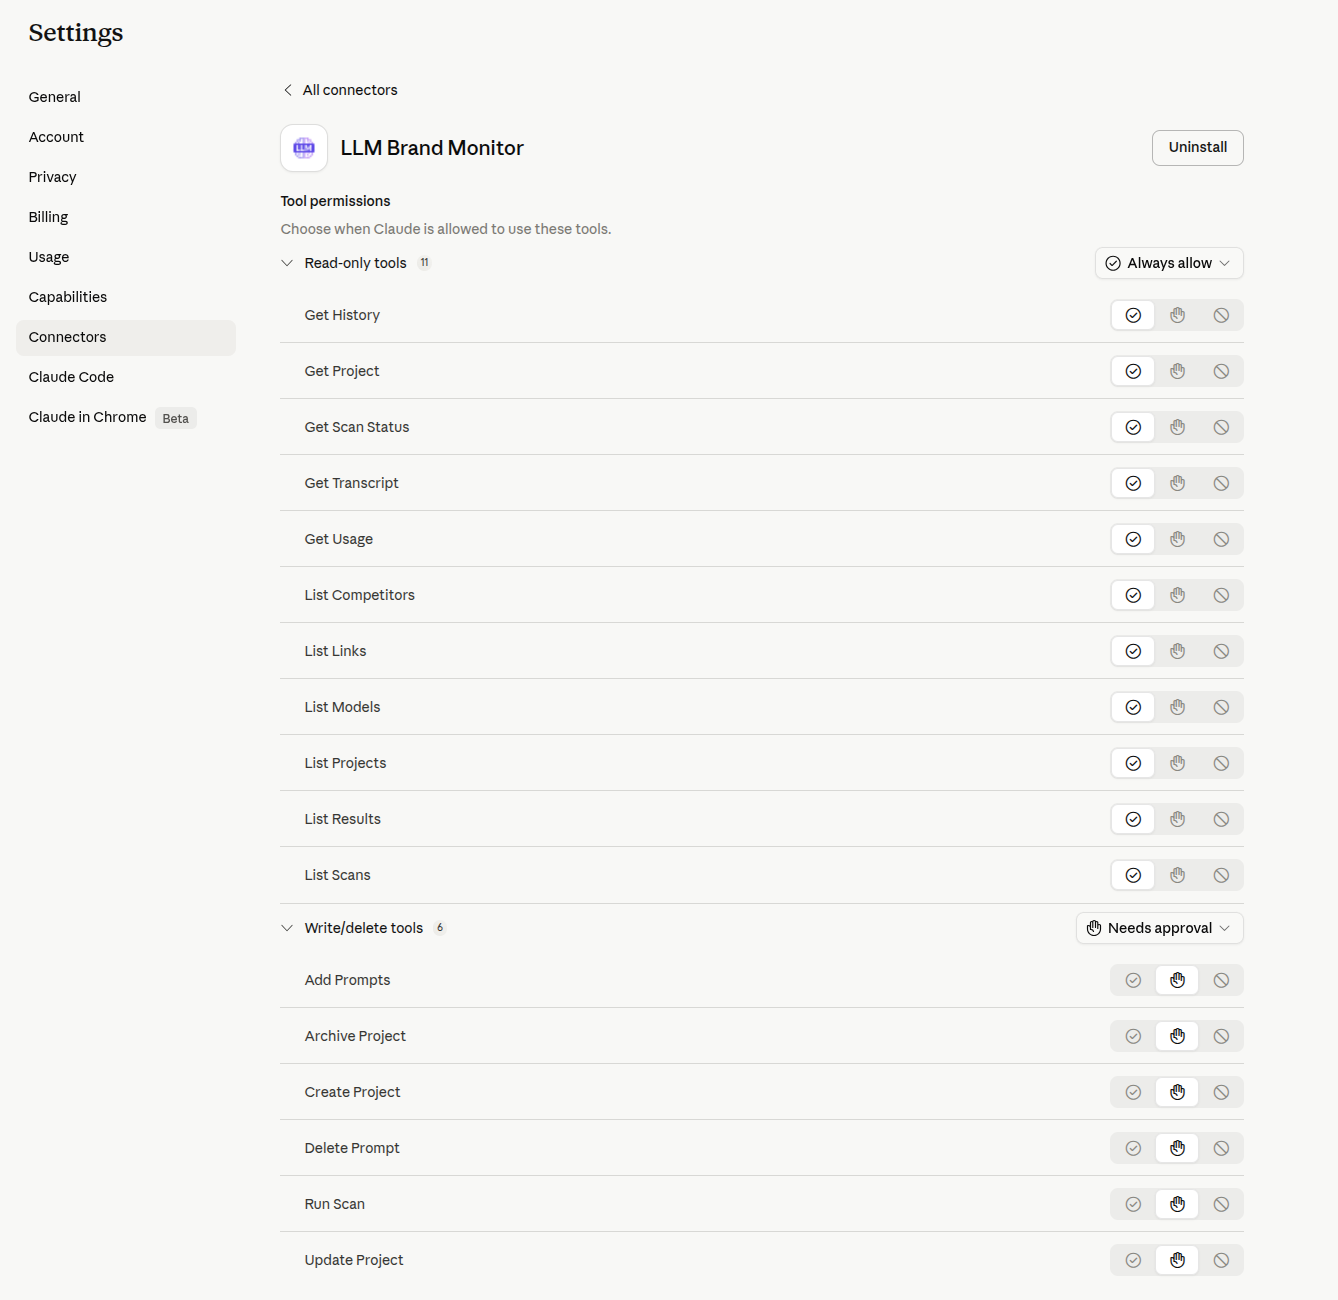
Claude’s defaults match LBM’s safety model: read-only tools (
List Projects,Get Transcript, …) auto-run, write/delete tools (Run Scan,Archive Project,Delete Prompt, …) require explicit approval each time. Recommended: keep these defaults —Run Scanin particular spends credits, so always-approve protects you from accidental scans. You can revisit this any time at Settings → Connectors → LLM Brand Monitor. -
In any conversation, open the + menu in the composer → Connectors → toggle LLM Brand Monitor on.
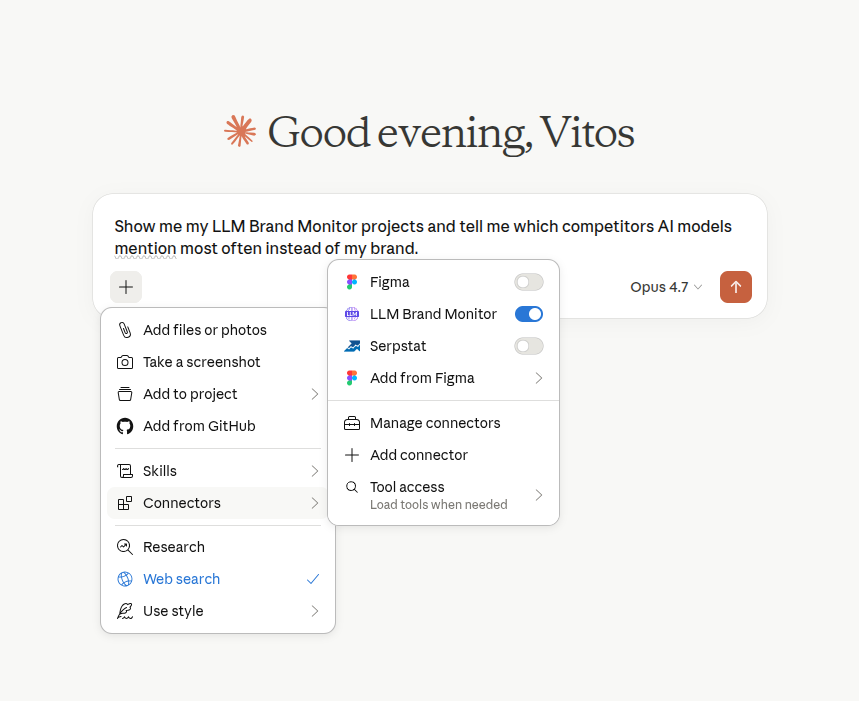
The toggle is per-conversation — if you start a new chat, enable it again. Other connectors stay independent.
-
Send a prompt. Claude calls the LBM tools, asking for confirmation on any write/delete action you didn’t pre-approve.
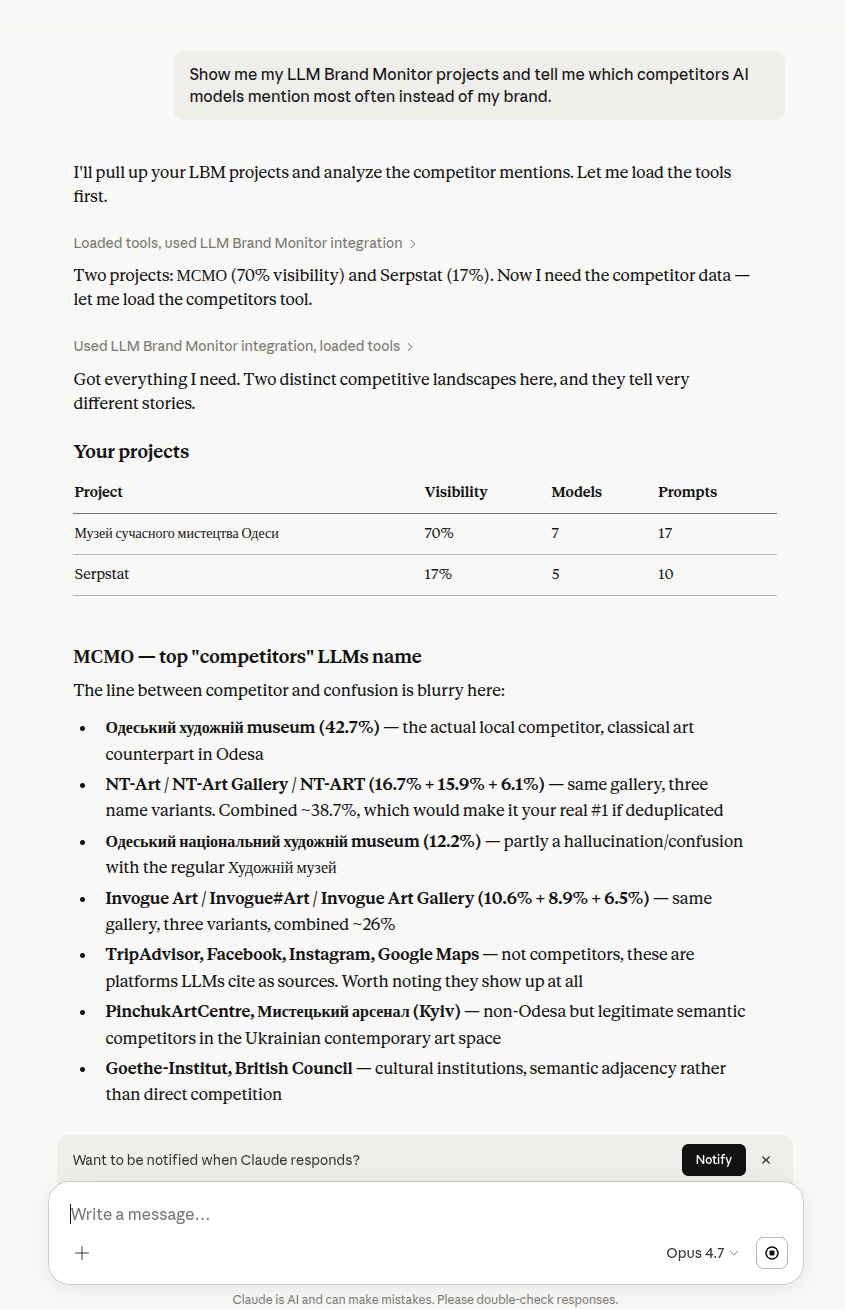
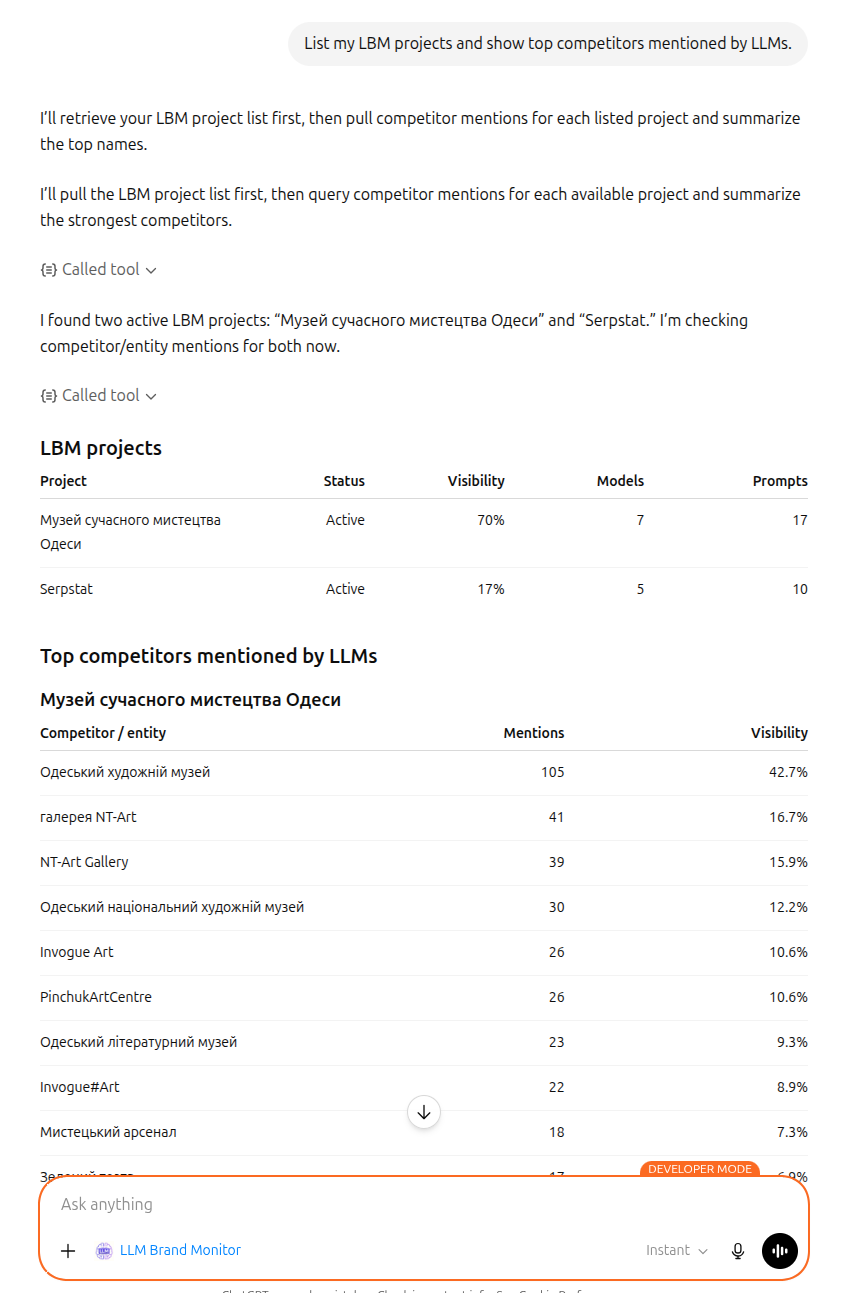
Example output for the prompt “Show me my LLM Brand Monitor projects and tell me which competitors AI models mention most often instead of my brand.” Claude returns project metadata plus a per-project competitor breakdown.
stdio (local) installation
All stdio clients run the same npm package — @serpstat/llm-brand-monitor-mcp — via npx. No global install required.
Prerequisites for every stdio client:
- Node.js 20 or newer — check with
node --version. Install from https://nodejs.org if missing. - An
LBM_API_KEYfrom your LBM profile.
The first run downloads the package; subsequent runs are instant (npm caches it).
Claude Desktop (Windows & macOS)
Claude Desktop reads MCP servers from claude_desktop_config.json. The fastest way to open it is from inside the app itself.
-
Open Claude Desktop → Settings → scroll down to the Desktop app group → Developer. Click Edit Config in the Local MCP servers panel.
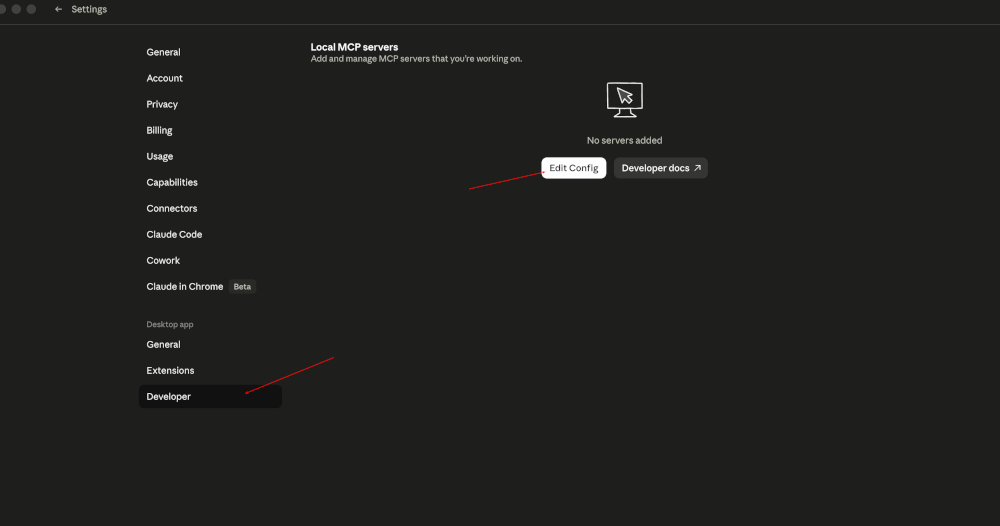
The Edit Config button reveals
claude_desktop_config.jsonin your default editor — no need to hunt for the file path manually. On older builds without this panel, open the file directly:OS Path macOS ~/Library/Application Support/Claude/claude_desktop_config.jsonWindows %APPDATA%\Claude\claude_desktop_config.json(typicallyC:\Users\<you>\AppData\Roaming\Claude\claude_desktop_config.json) -
Add an
lbmentry undermcpServers. If the file is empty, paste the whole snippet; if you already have other servers, just addlbmnext to them and keep the JSON valid:{ "mcpServers": { "lbm": { "command": "npx", "args": ["-y", "@serpstat/llm-brand-monitor-mcp"], "env": { "LBM_API_KEY": "lbm_your_key_here" } } } }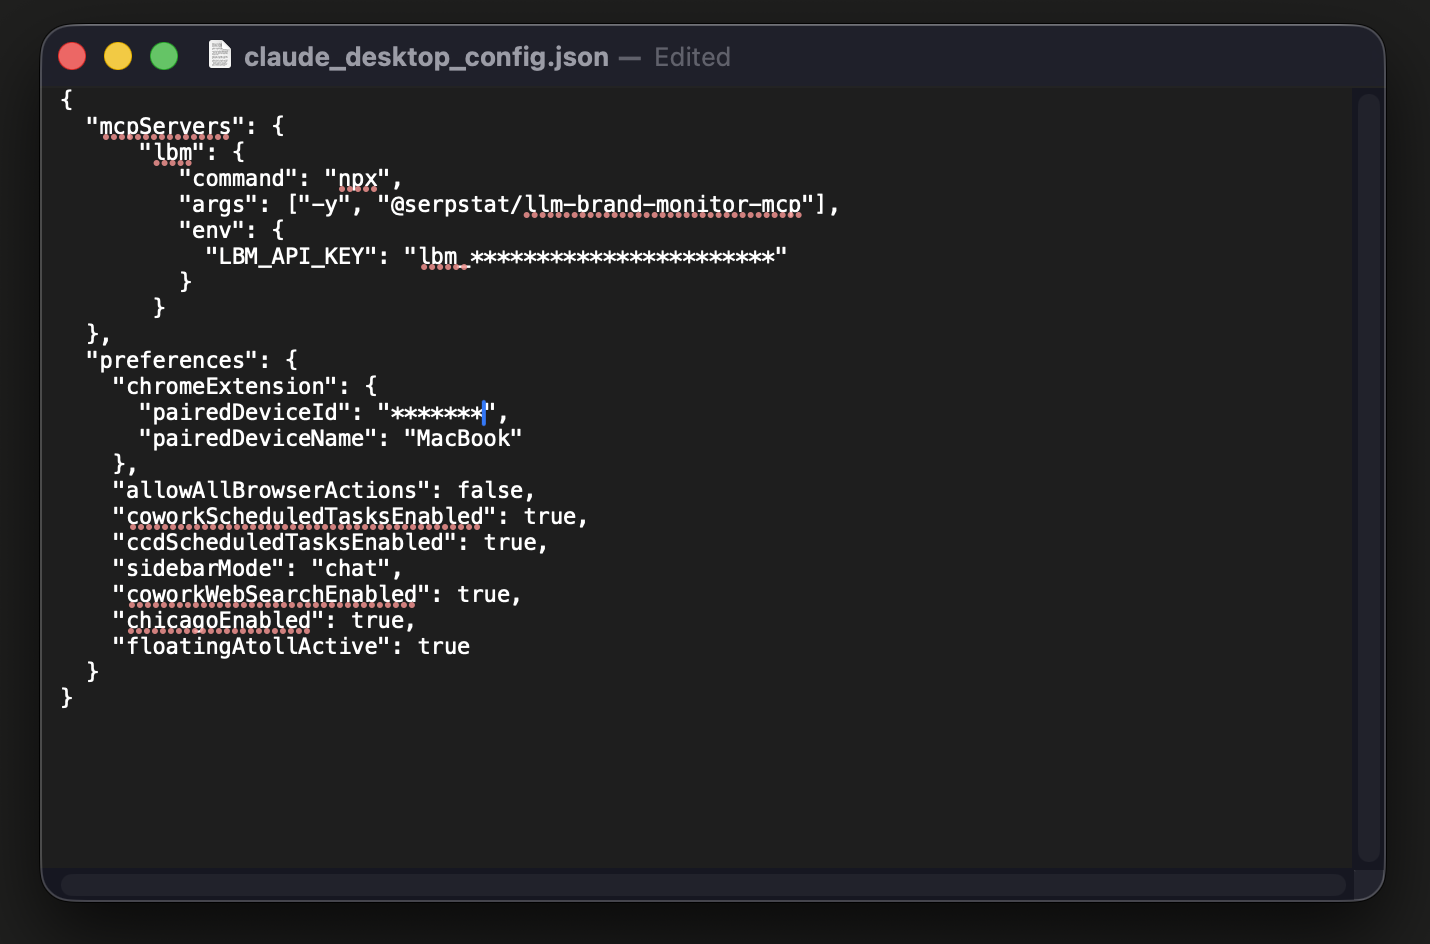
Replace
lbm_your_key_herewith the key you copied from your LBM profile. Other top-level keys likepreferences(if present) stay untouched — onlymcpServers.lbmis what matters. -
Save the file and fully quit Claude Desktop (right-click tray icon → Quit on Windows; ⌘Q on macOS), then relaunch it. A simple window-close is not enough — Claude only re-reads the config on a clean restart.
-
Verify the server is up: Settings → Developer → Local MCP servers. The
lbmentry should show a green running badge.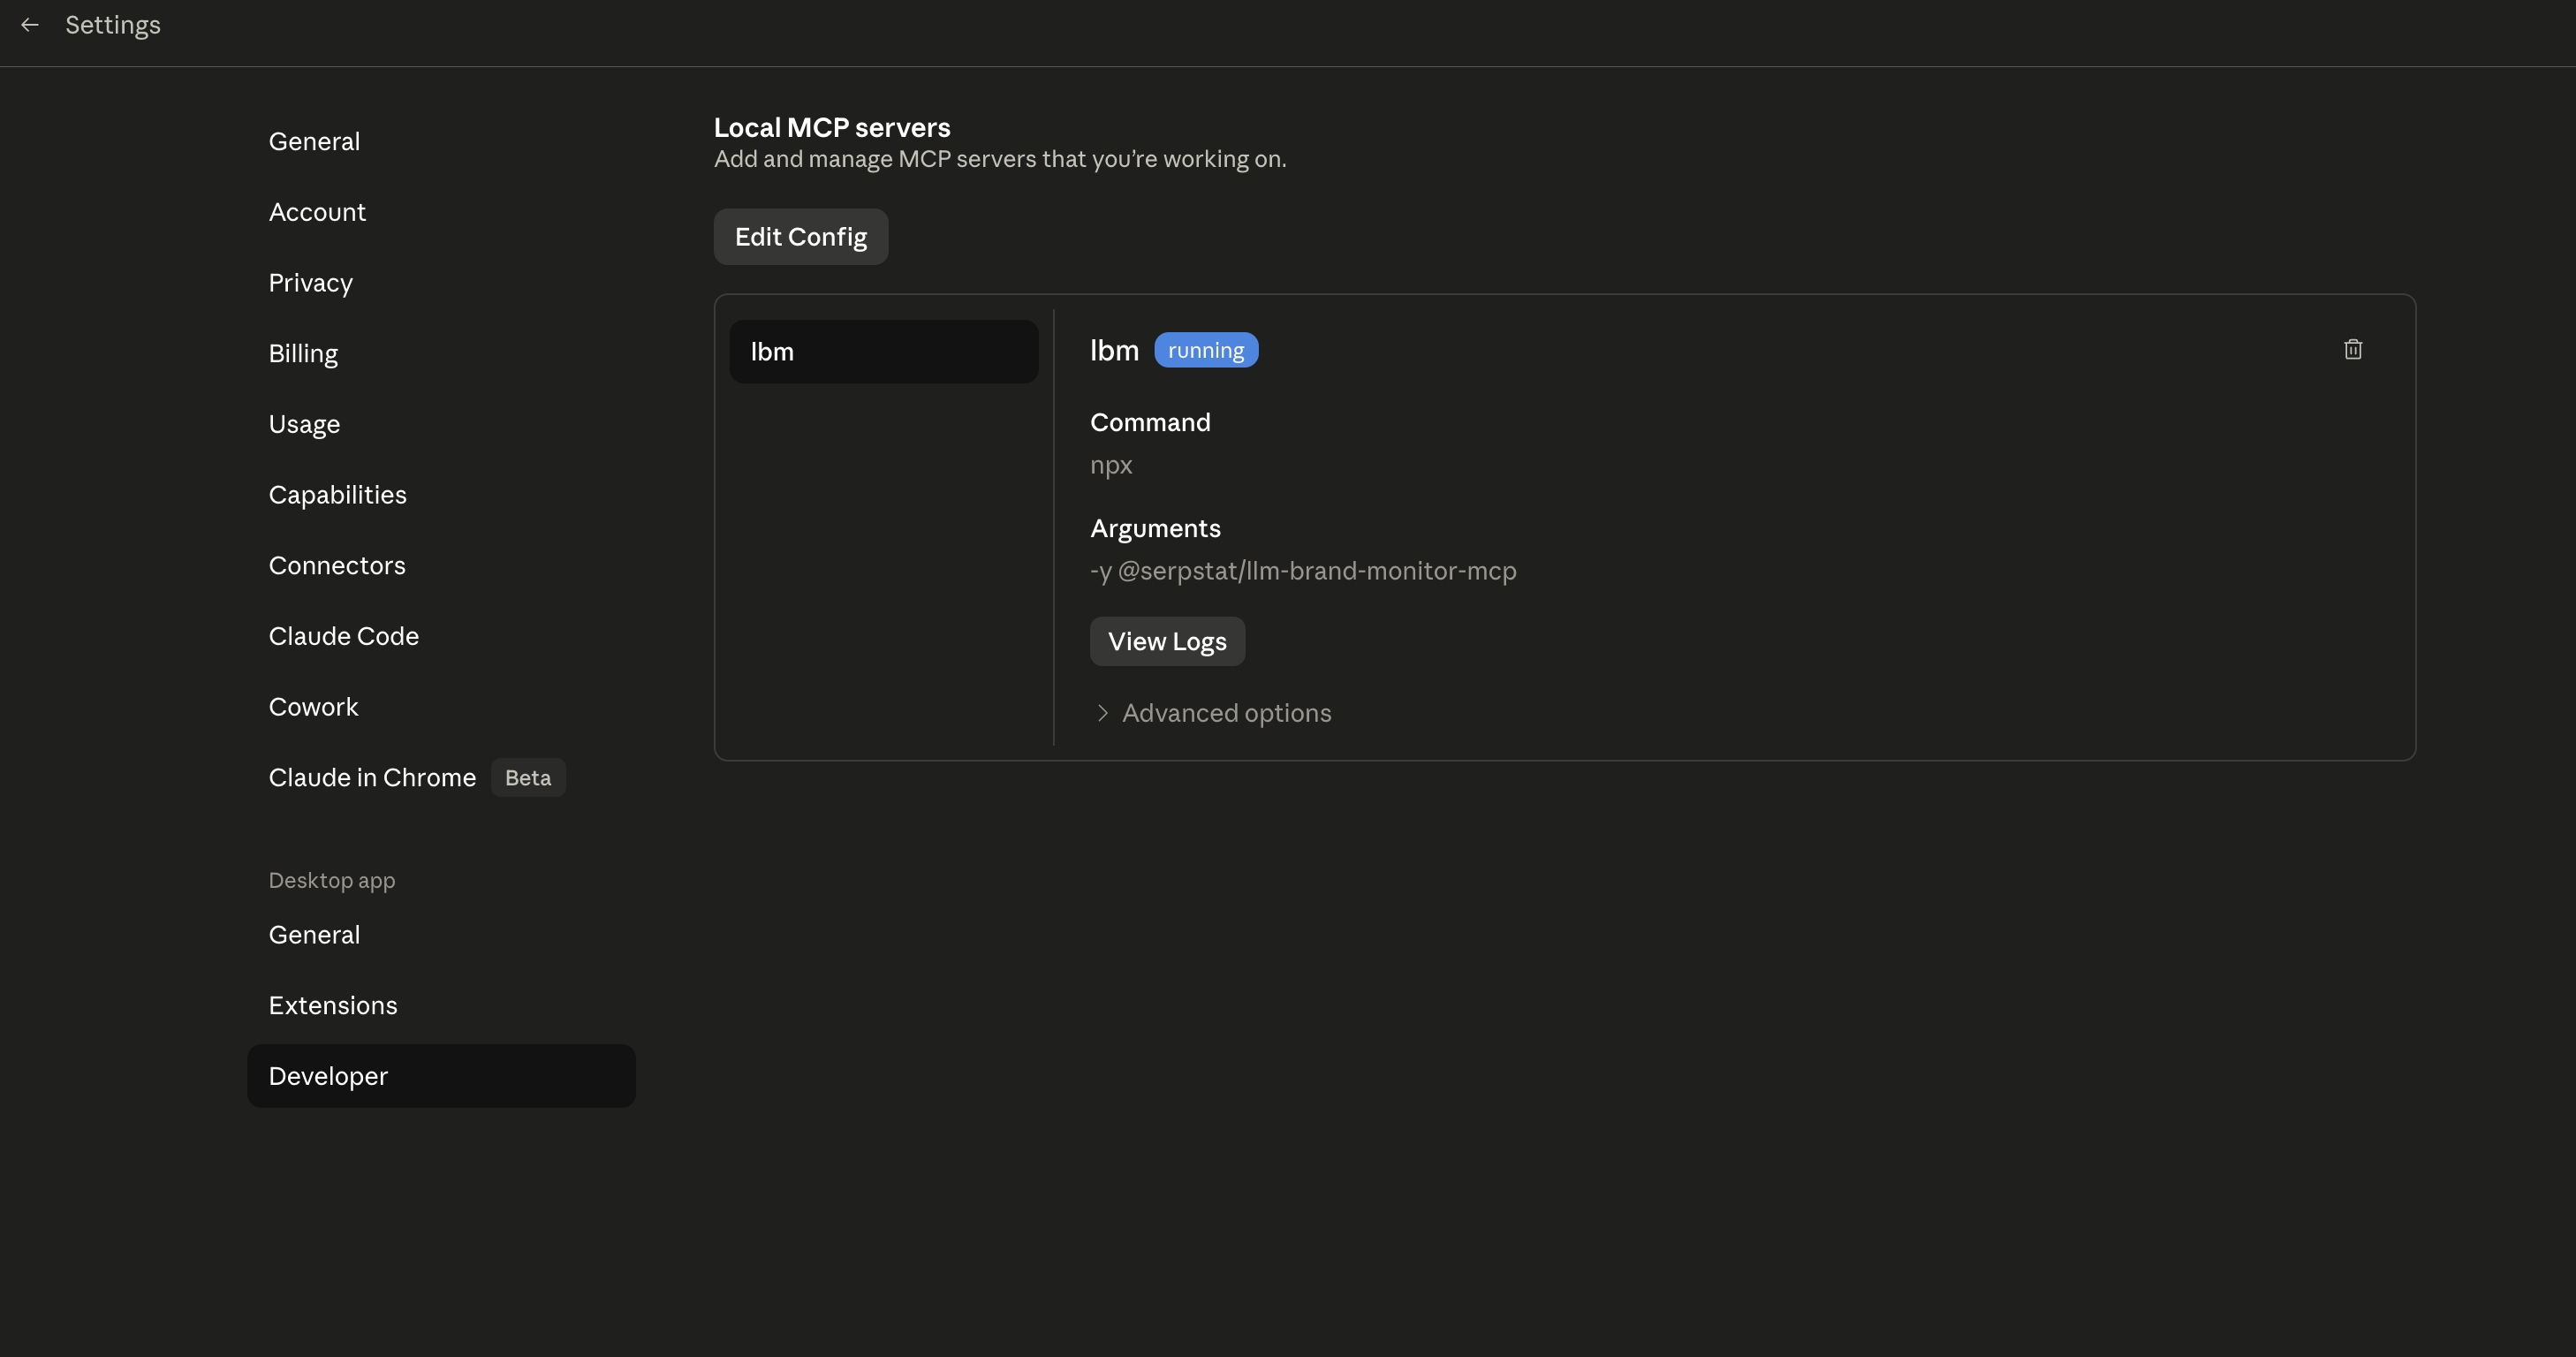
If you see a red status instead, click View Logs for the stderr output — most issues are missing
LBM_API_KEY, JSON typos, ornpxnot onPATH(see the Windows note below). -
Open a new conversation. Click the + in the composer → Connectors → toggle lbm on.

Same per-conversation toggle as Claude Web — enable it again in any new chat. The 17 LBM tools become available immediately.
-
Ask Claude something — it will call the LBM tools and return live data.
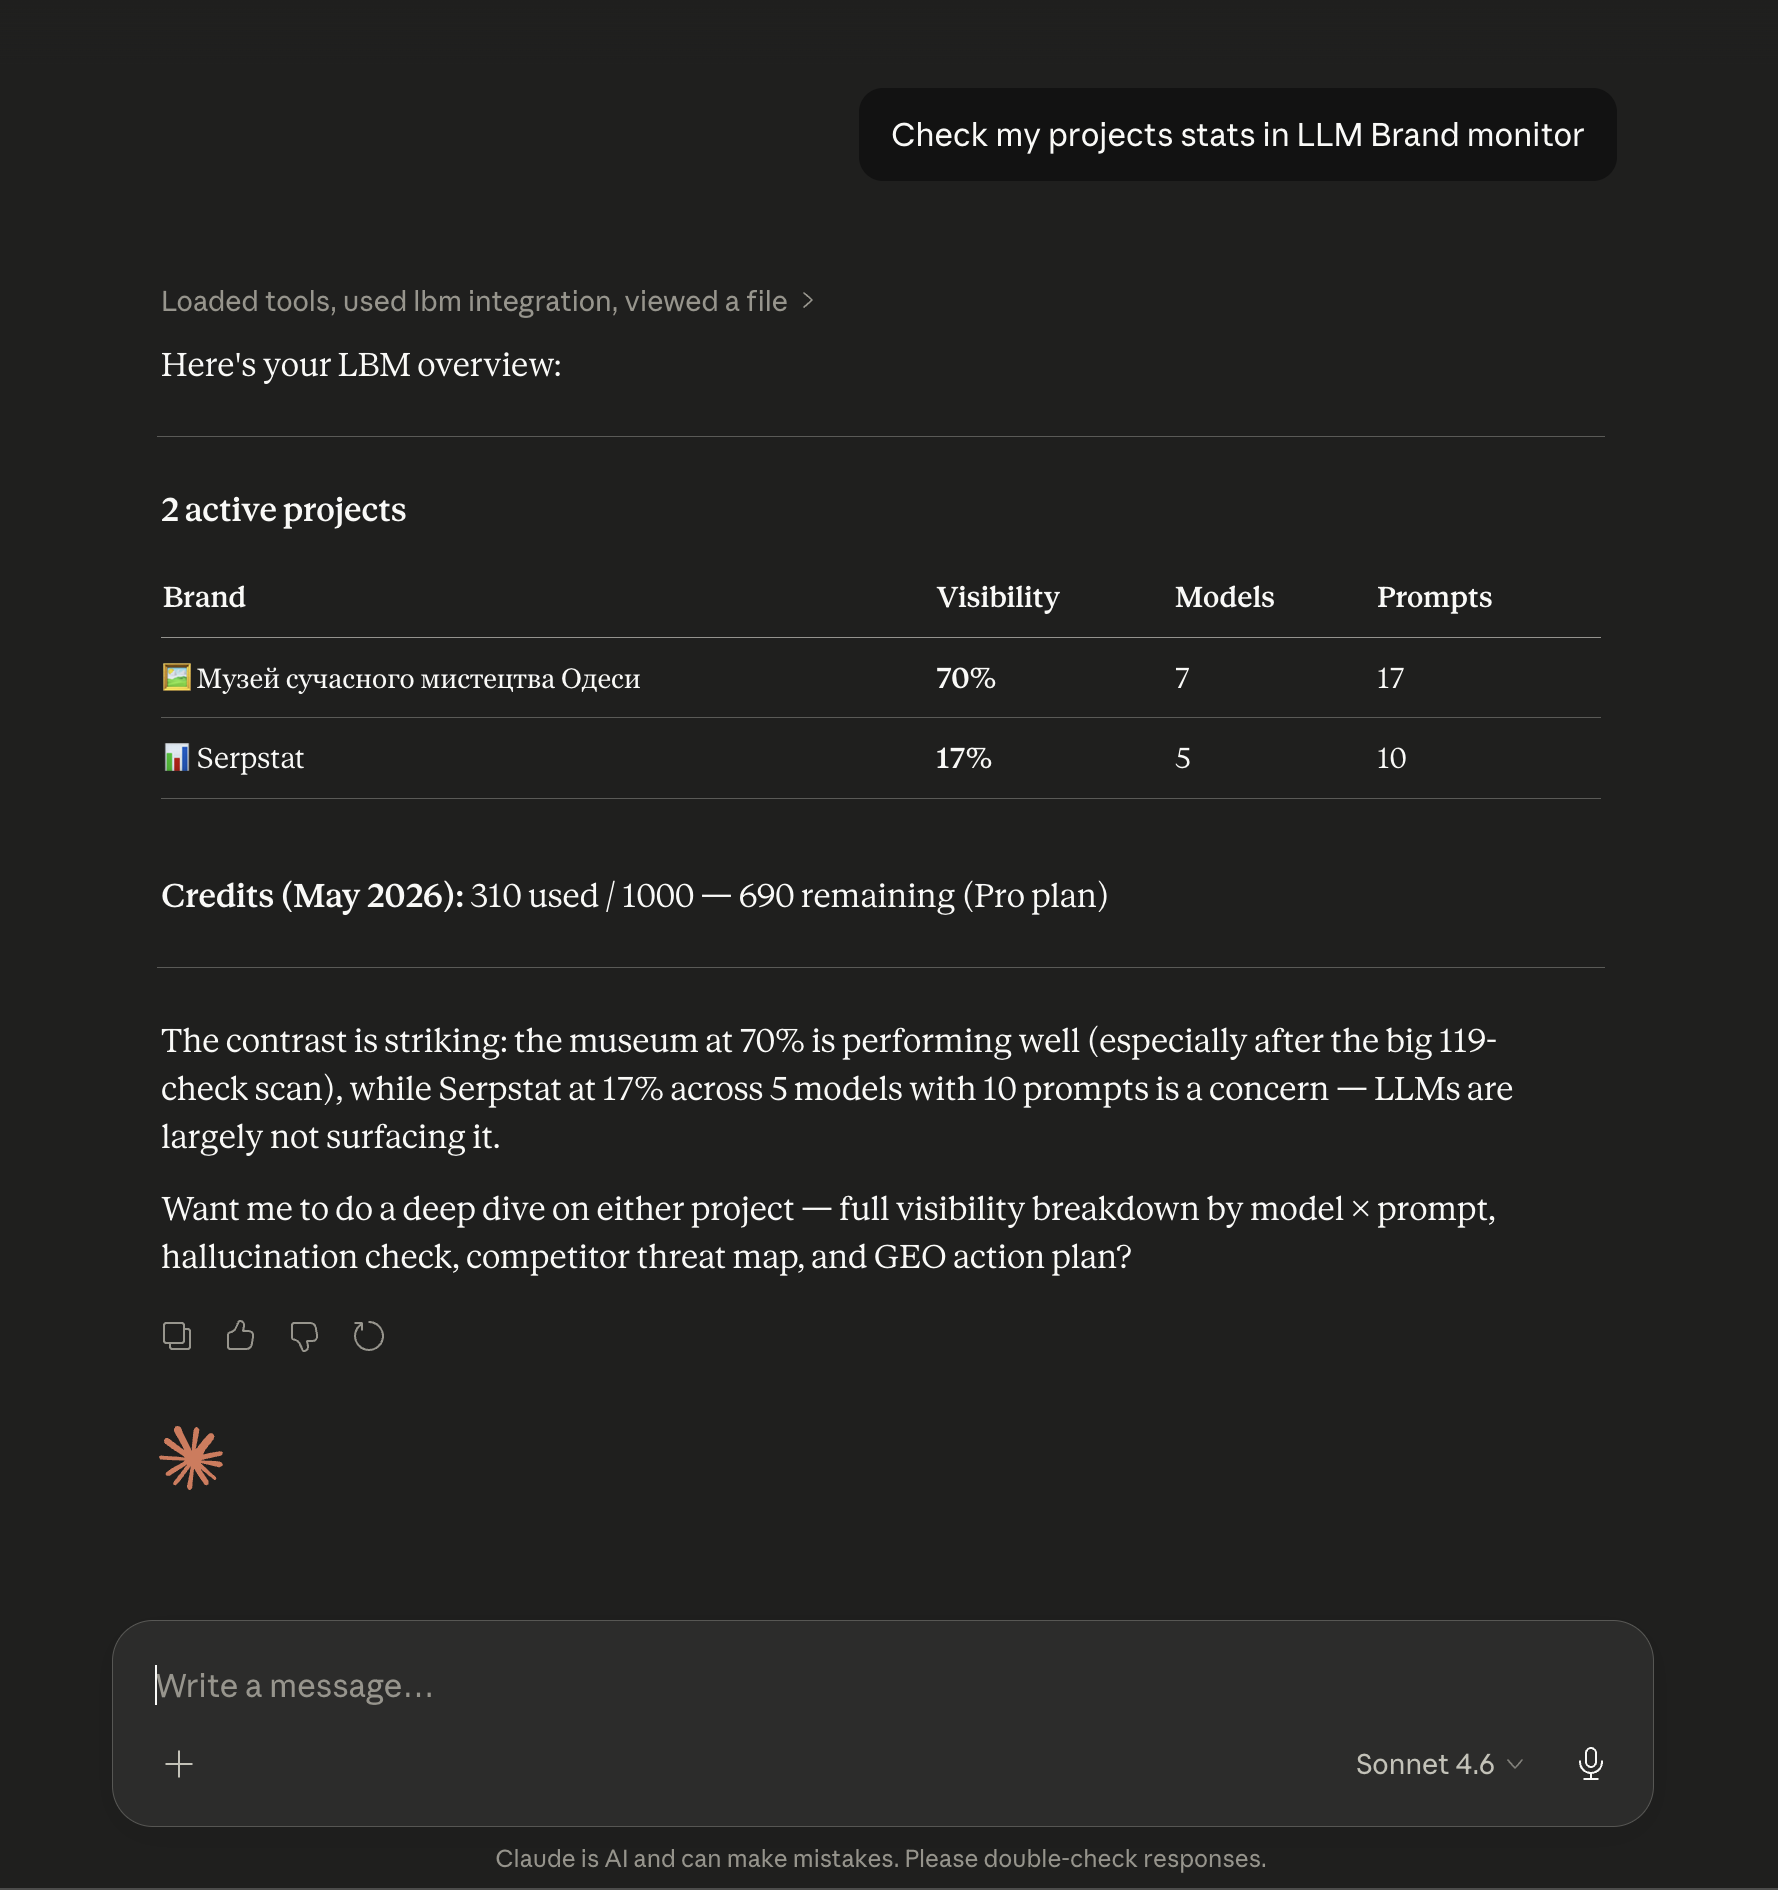
Example output for the prompt “Check my projects stats in LLM Brand monitor.” The “Loaded tools, used lbm integration…” line confirms the MCP server was actually called.
Windows note: if you use nvm-windows or a non-standard Node install, npx may not be on PATH for GUI apps. In that case, replace "command": "npx" with the absolute path, e.g. "C:\\Program Files\\nodejs\\npx.cmd".
Claude Code
Claude Code is Anthropic’s terminal CLI. It has a built-in mcp add command — the only thing to decide upfront is scope: where the server is registered and which Claude Code sessions can see it.
Pick a scope:
| Scope | Flag | Stored in | Visible in | Best for |
|---|---|---|---|---|
local | (default) | ~/.claude.json under the current cwd | Only sessions started from this exact project directory | Trying things out, or when LBM matters only for this one repo |
user | -s user | ~/.claude.json user-level section | Every Claude Code session on this machine | The usual choice — you want LBM available everywhere without re-adding it per project |
project | -s project | .mcp.json at the repo root (commit it) | Anyone who clones this repo and runs Claude Code inside it | Shared team setup — teammates get the same MCP servers, but each must supply their own LBM_API_KEY env |
Tip: for the
projectscope, don’t hardcode the API key into.mcp.json— instead, reference an env var ("env": { "LBM_API_KEY": "${LBM_API_KEY}" }) and have each teammate export it in their shell. Otherwise the key ends up in git history.
Add globally (most common — recommended):
claude mcp add lbm-mcp -s user \
-e LBM_API_KEY=lbm_your_key_here \
-- npx -y @serpstat/llm-brand-monitor-mcpAdd only for the current project:
# run from inside the project directory
claude mcp add lbm-mcp \
-e LBM_API_KEY=lbm_your_key_here \
-- npx -y @serpstat/llm-brand-monitor-mcpAdd as a shared team config (commits .mcp.json to the repo):
# run from inside the project directory
claude mcp add lbm-mcp -s project \
-e LBM_API_KEY='${LBM_API_KEY}' \
-- npx -y @serpstat/llm-brand-monitor-mcpVerify:
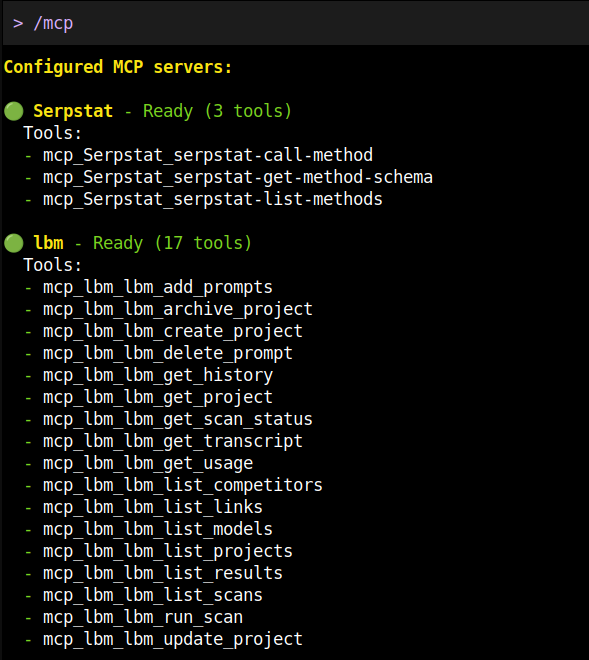
claude mcp listYou should see lbm-mcp in the output. Inside any Claude Code session, type /mcp to see live tool status:
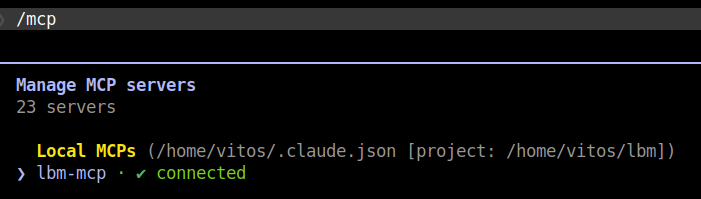
The /mcp command groups servers by scope (Local MCPs, User MCPs, Project MCPs) and shows each one’s connection state. A green ✓ connected next to lbm-mcp means the npm package downloaded, the process started, and your LBM_API_KEY was accepted.
Press Enter on lbm-mcp to drill into the tool list:
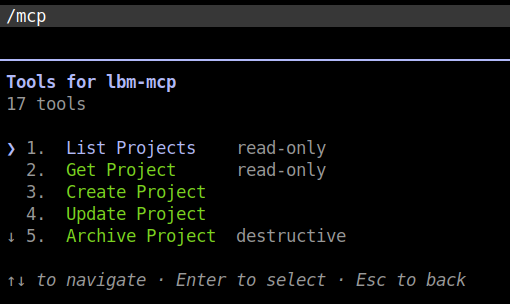
All 17 LBM tools, tagged by Claude Code: read-only for safe lookups, destructive for tools that mutate state (Archive Project, Delete Prompt, and the credit-spending Run Scan). Claude Code asks for explicit approval before calling any destructive tool.
Use it: in any Claude Code session, just ask — Claude routes to LBM tools automatically.
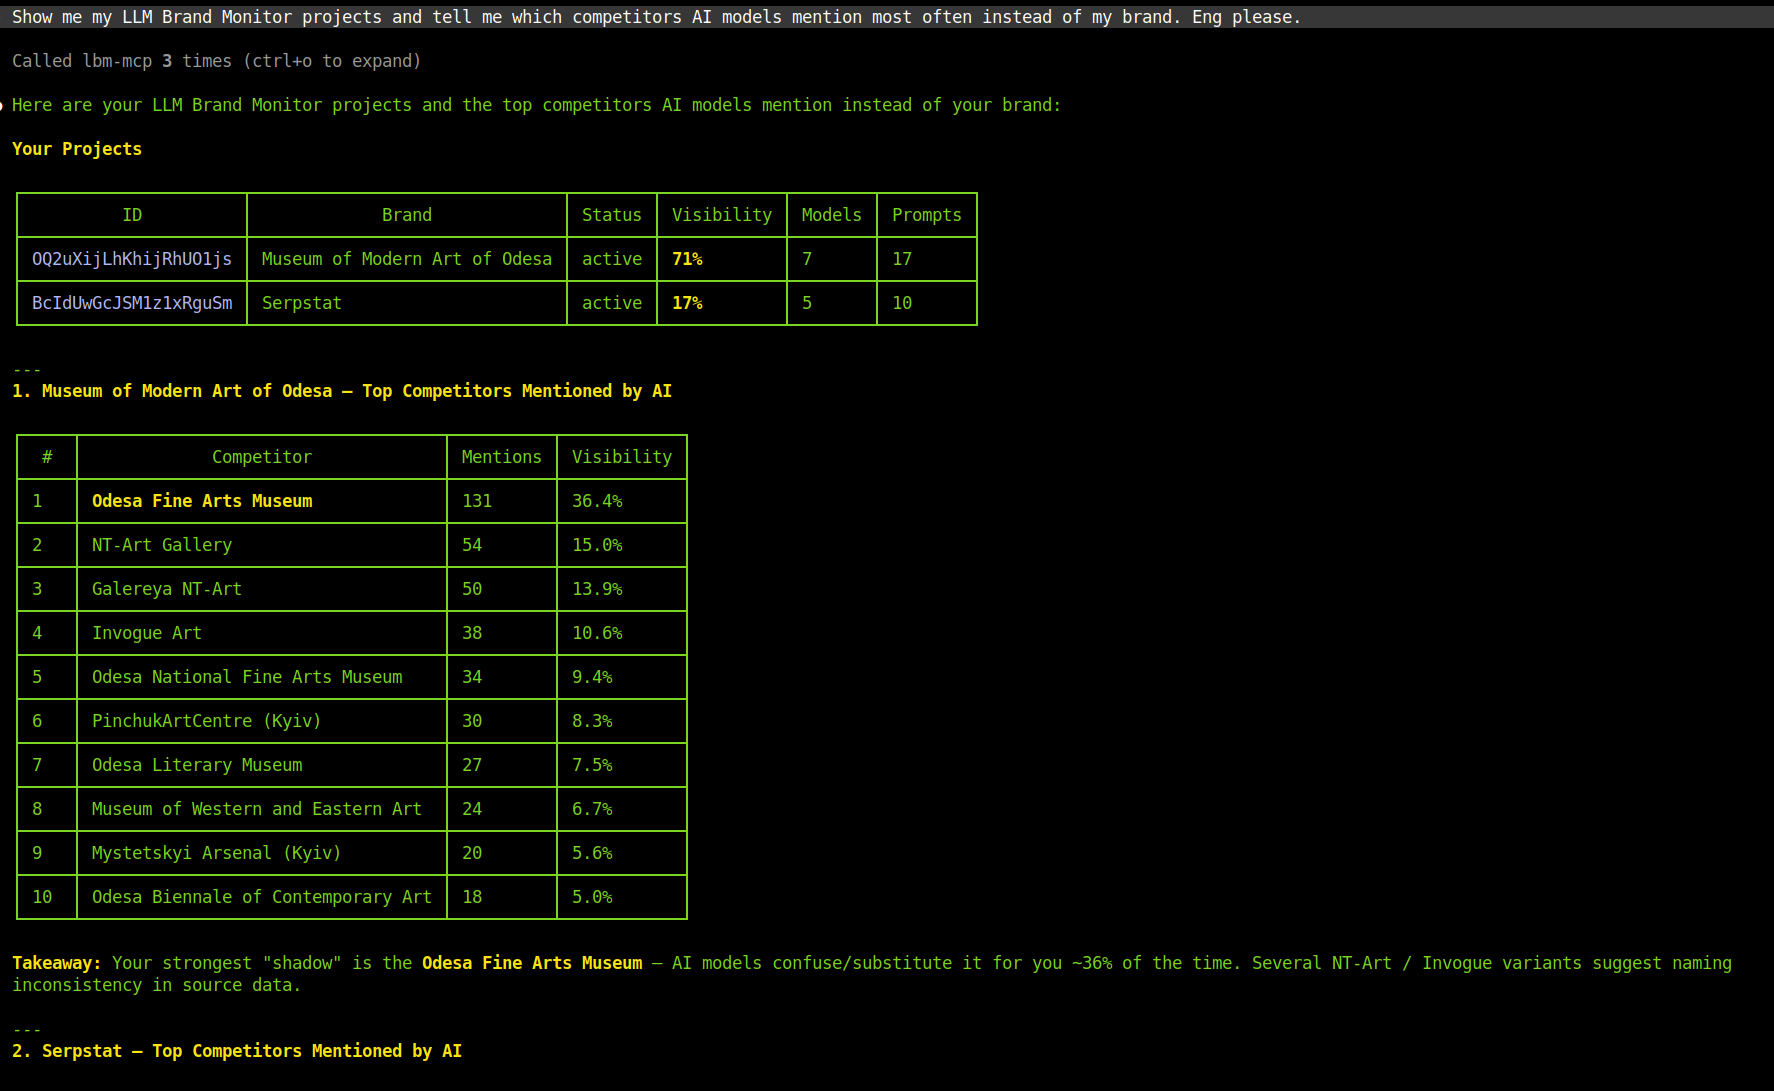
Example output for the prompt “Show me my LLM Brand Monitor projects and tell me which competitors AI models mention most often instead of my brand. Eng please.” The header Called lbm-mcp 3 times (ctrl+o to expand) confirms the MCP server was invoked — press ctrl+o to inspect each call’s raw input/output.
Remove later:
claude mcp remove lbm-mcp # removes from local scope (or whichever was used)
claude mcp remove lbm-mcp -s user # removes the global registration
claude mcp remove lbm-mcp -s projectCodex CLI
OpenAI Codex CLI has a built-in codex mcp add command — same idea as Claude Code, just with slightly different flag names.
Add the server:
codex mcp add lbm \
--env LBM_API_KEY=lbm_your_key_here \
-- npx -y @serpstat/llm-brand-monitor-mcpA few things to note:
- The
--separator is required before the command — everything after it is the launch command for the MCP process. --envtakes a singleKEY=VALUE; repeat the flag to pass multiple env vars.- Codex writes the server into
~/.codex/config.tomlas[mcp_servers.lbm]— you can hand-edit that file later if you prefer.
Verify:
codex mcp listlbm should appear in the output. Inside any Codex session you can also run /mcp to inspect connection state and the available tools:
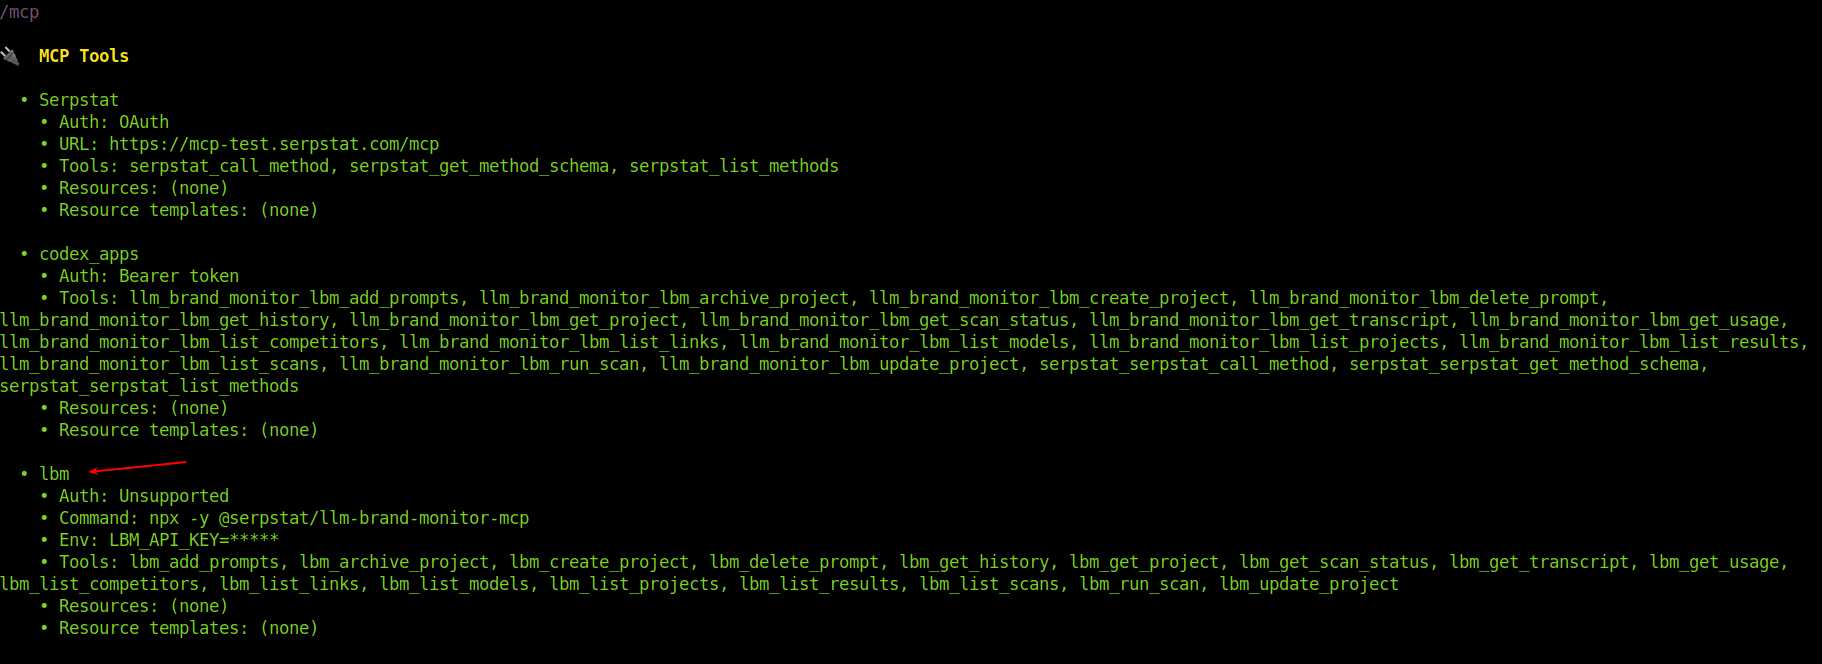
The /mcp panel shows every configured MCP server. For lbm you can verify the launch command (npx -y @serpstat/llm-brand-monitor-mcp), confirm the env contains LBM_API_KEY (masked as *****), and see all 17 tools enumerated as lbm_list_projects, lbm_run_scan, etc. Codex’s Auth: Unsupported line just means there’s no OAuth on stdio servers — the API key in Env is doing the auth.
Use it: ask Codex anything — it will route to LBM tools as needed.
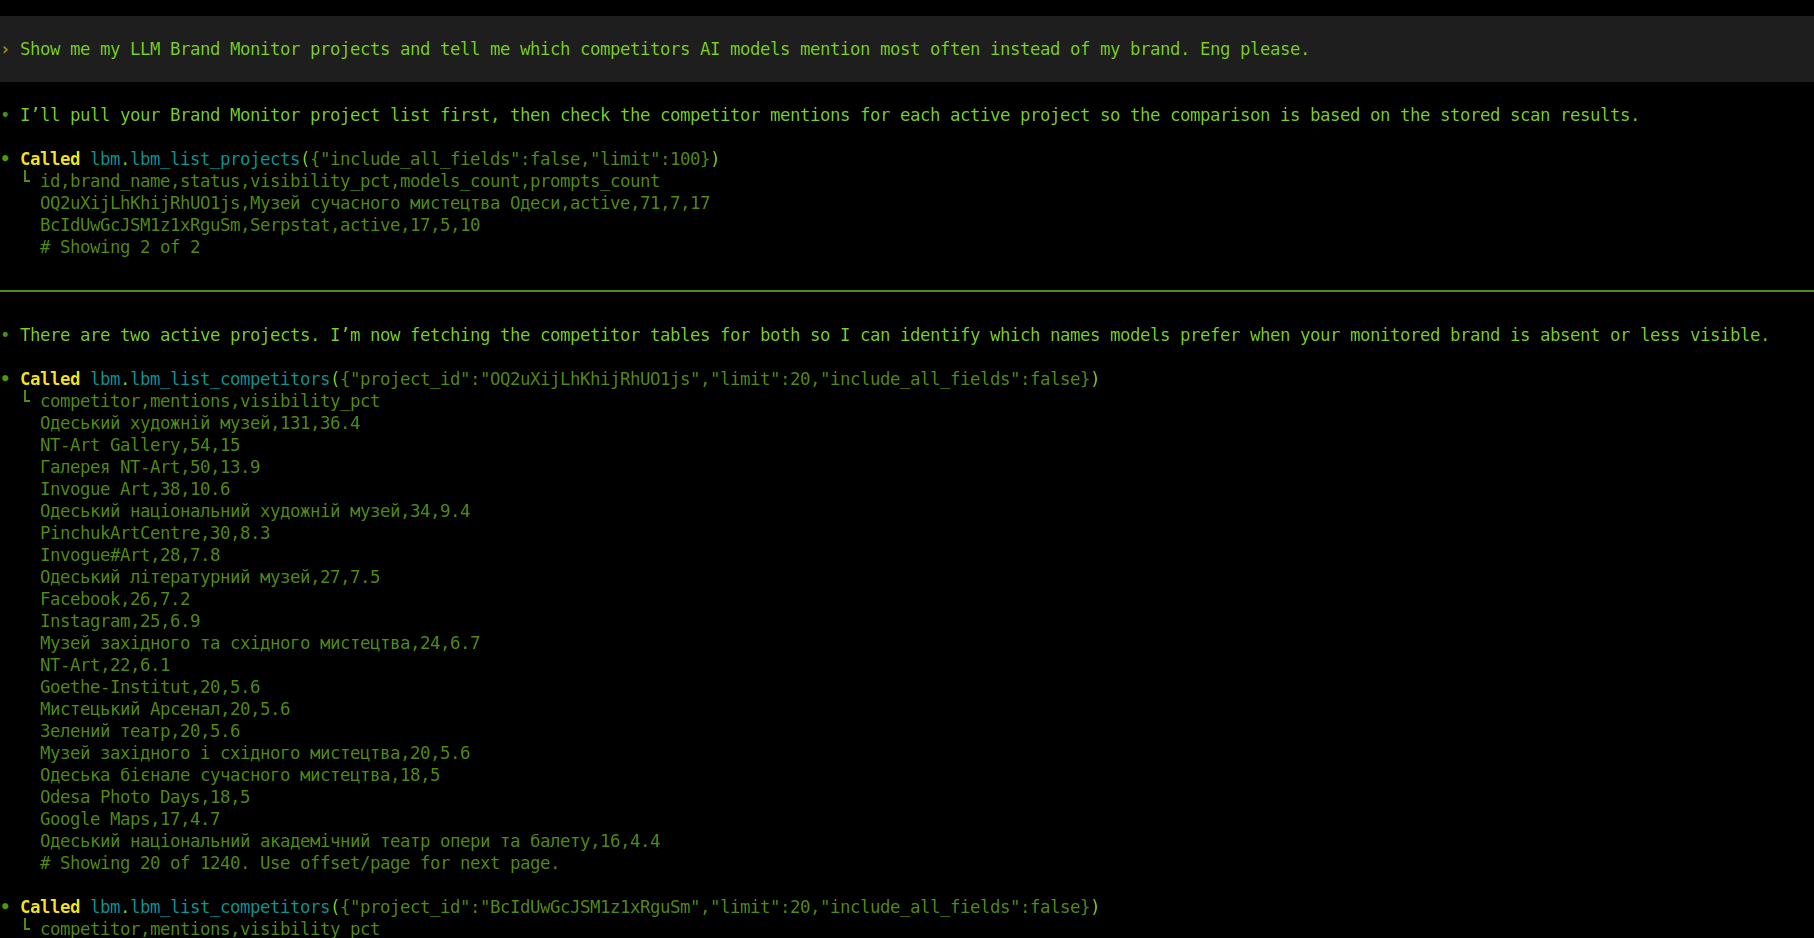
Example output for the prompt “Show me my LLM Brand Monitor projects and tell me which competitors AI models mention most often instead of my brand. Eng please.” The Called lbm.list_projects(...) and Called lbm.list_competitors(...) lines are Codex’s tool-call trace — they’re your evidence that the MCP server actually ran.
Remove later:
codex mcp remove lbmManual config (alternative): if you’d rather edit the TOML directly — useful for committing a shared team config — add this block to ~/.codex/config.toml:
[mcp_servers.lbm]
command = "npx"
args = ["-y", "@serpstat/llm-brand-monitor-mcp"]
env = { LBM_API_KEY = "lbm_your_key_here" }Save and restart any running codex session for the change to take effect.
Gemini CLI
Gemini CLI has a built-in gemini mcp add command — same idea as Claude Code and Codex, just with different positional syntax (the launch command and its args are passed inline, no -- separator).
Pick a scope:
| Scope | Flag | Stored in | Visible in | Best for |
|---|---|---|---|---|
project | (default) | .gemini/settings.json in the cwd | Only sessions started from this exact project directory | Trying things out, or when LBM matters only for this one repo |
user | -s user | ~/.gemini/settings.json | Every Gemini CLI session on this machine | The usual choice — you want LBM available everywhere without re-adding it per project |
Note: Gemini CLI’s default scope is
project, the opposite of Claude Code (which defaults tolocal/cwd-only and gates global behind-s user). The end result for the default is similar — per-project — but the flag you need for global differs.
Add globally (most common — recommended):
gemini mcp add -s user \
-e LBM_API_KEY=lbm_your_key_here \
lbm npx -y @serpstat/llm-brand-monitor-mcpThe positional arguments are: <name> <commandOrUrl> [args...]. So lbm is the server name, npx is the command, and -y @serpstat/llm-brand-monitor-mcp are its arguments.
Add only for the current project:
# run from inside the project directory
gemini mcp add \
-e LBM_API_KEY=lbm_your_key_here \
lbm npx -y @serpstat/llm-brand-monitor-mcpVerify:
gemini mcp listInside any Gemini session, run /mcp to see live connection state and the available tools:
The Configured MCP servers panel marks each server with a coloured dot — green means Ready, the process started cleanly and tools were discovered. For lbm you should see Ready (17 tools) with all 17 LBM tools listed underneath. Note Gemini’s tool-name convention: mcp_<server>_<tool>, so lbm_run_scan shows up as mcp_lbm_lbm_run_scan — Gemini uses these prefixed names internally, but you don’t need to type them, just talk to Gemini in natural language.
Use it: ask Gemini anything about your LBM account — it will pick the right tools automatically.
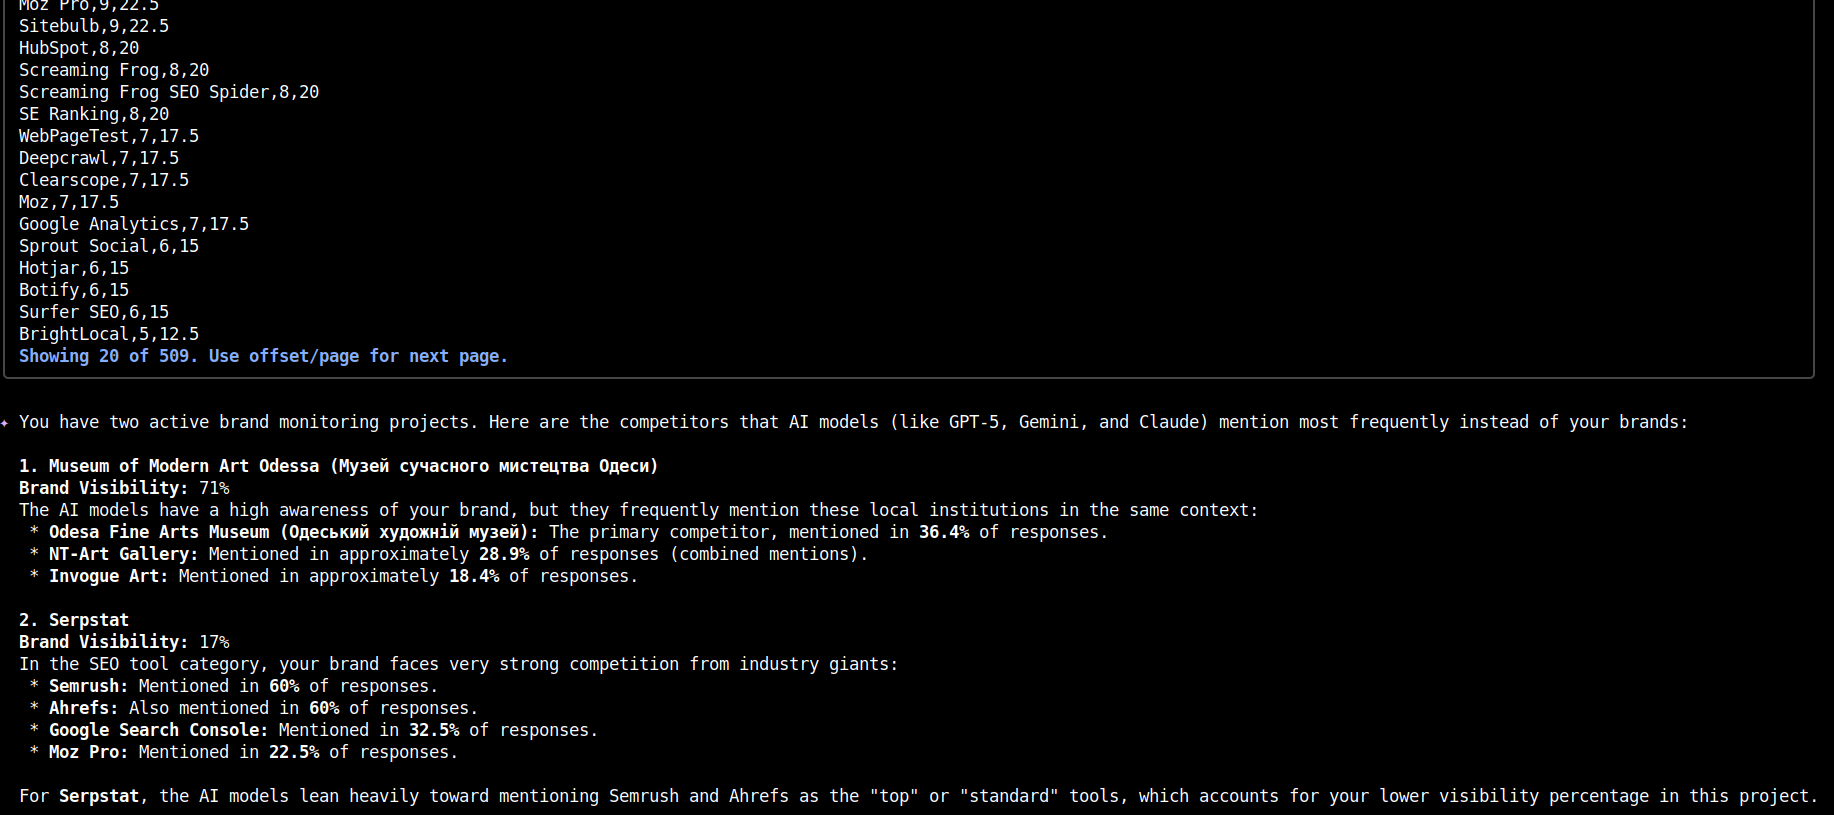
Example output for the prompt “Show me my LLM Brand Monitor projects and tell me which competitors AI models mention most often instead of my brand. Eng please.” The CSV-style block above the summary is raw lbm_list_competitors output (Gemini paginates at 20 rows by default — Showing 20 of 509. Use offset/page for next page.), and the prose below is Gemini’s synthesis with brand visibility per project.
Remove later:
gemini mcp remove lbm # removes from project scope (default)
gemini mcp remove -s user lbm # removes the global registrationManual config (alternative): if you’d rather edit JSON directly, add this to ~/.gemini/settings.json (global) or .gemini/settings.json (per-project), then restart gemini:
{
  "mcpServers": {
    "lbm": {
      "command": "npx",
      "args": ["-y", "@serpstat/llm-brand-monitor-mcp"],
      "env": {
        "LBM_API_KEY": "lbm_your_key_here"
      }
    }
  }
}OpenClaw
OpenClaw is a self-hosted automation runtime. It manages its own MCP config via the openclaw mcp subcommand — different from Claude Code / Codex / Gemini in that it doesn’t take separate --env and -- flags; instead, the entire server definition is passed as a single JSON object.
Add the server:
openclaw mcp set lbm '{
  "command": "npx",
  "args": ["-y", "@serpstat/llm-brand-monitor-mcp"],
  "env": { "LBM_API_KEY": "lbm_your_key_here" }
}'
The JSON shape is the same as the standard mcpServers.<name> block used by Claude Desktop and Gemini — openclaw mcp set just takes that object verbatim. Mind the shell quoting: single-quote the JSON to keep $, ", and newlines literal.
Verify:
openclaw mcp list           # one-line summary of every configured server
openclaw mcp show lbm       # full JSON for the lbm server
openclaw mcp show           # full MCP config (all servers)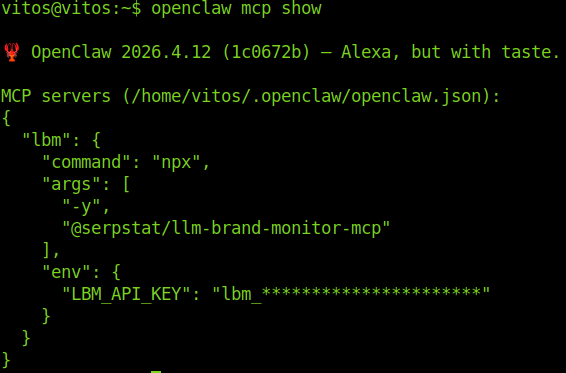
openclaw mcp show reads ~/.openclaw/openclaw.json and prints the MCP block verbatim. The LBM_API_KEY value is masked (lbm_*****) — useful when sharing logs or screenshots. If you don’t see your lbm entry here, the openclaw mcp set command didn’t persist; double-check shell quoting on the JSON.
Use it: start an OpenClaw agent session and ask away — OpenClaw routes to LBM tools automatically.
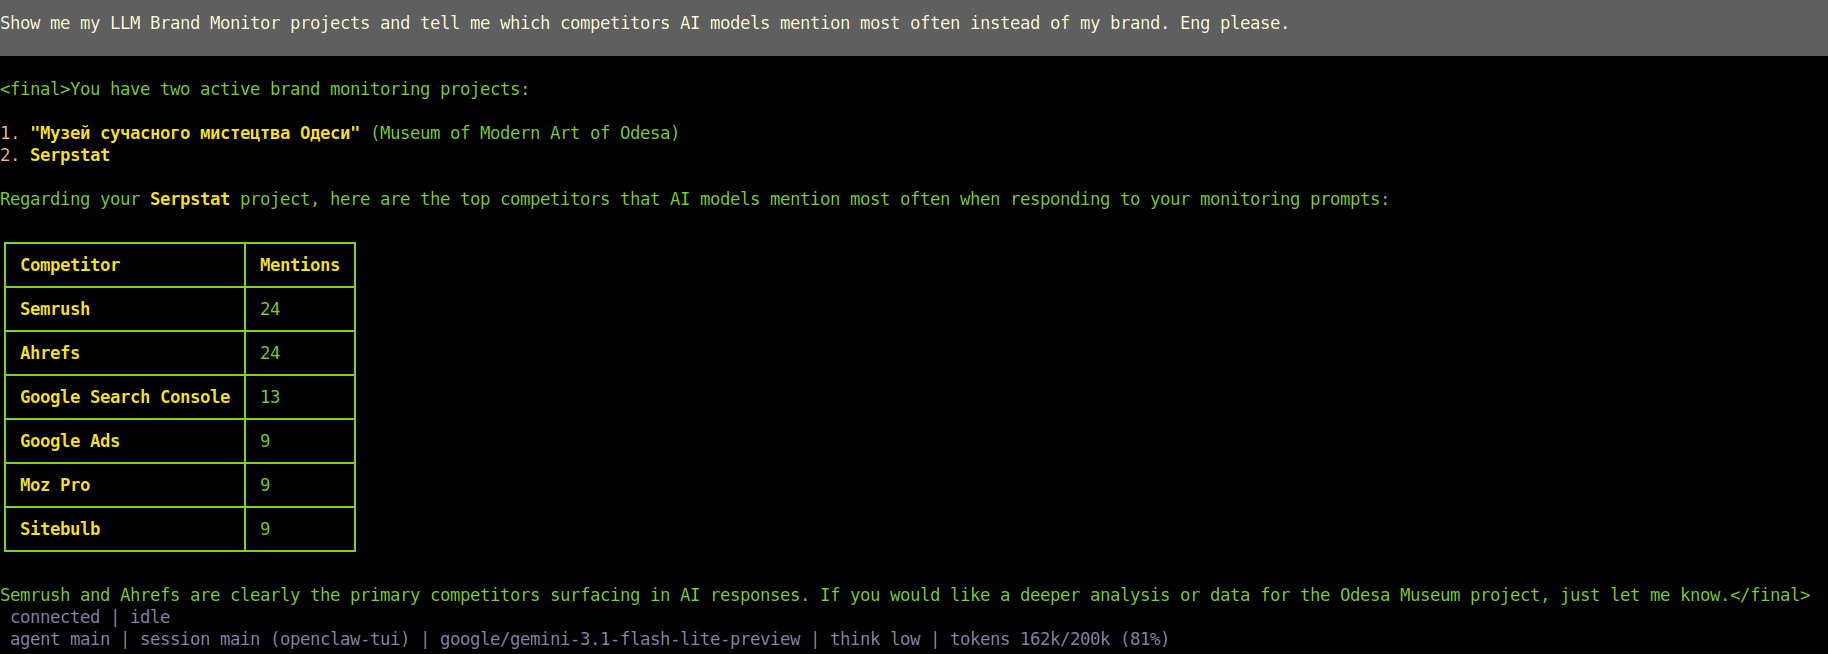
Example output for the prompt “Show me my LLM Brand Monitor projects and tell me which competitors AI models mention most often instead of my brand. Eng please.” The status line at the bottom (agent main · session main · google/gemini-3.1-flash-lite-preview · tokens 162k/200k) shows OpenClaw running with Gemini as the underlying model — LBM tools work the same regardless of which LLM provider you wire OpenClaw to.
Remove later:
openclaw mcp unset lbmTip — bridge OpenClaw’s own channels into another MCP client: openclaw mcp serve exposes OpenClaw automation channels over MCP stdio. That’s orthogonal to LBM — you only need it if you want Claude/ChatGPT/etc. to drive OpenClaw itself. For LBM access, the set command above is all you need.
Verifying the connection
Once installed (HTTP or stdio), test it in any conversation with one of these prompts:
- Smoke test:
What LLM Brand Monitor projects do I have?→ the assistant should calllbm_list_projects. - Credits:
How many LBM credits do I have left?→ callslbm_get_usage. - End-to-end:
List my LBM projects, then show me the latest scan for the first one.→ exerciseslbm_list_projects+lbm_list_scans.
If the assistant says it doesn’t see the tools, see Troubleshooting.
Troubleshooting
| Symptom | Likely cause | Fix |
|---|---|---|
command not found: npx | Node.js isn’t installed or not on PATH | Install Node 20+ from https://nodejs.org. On Windows, restart the client app after install. |
UNAUTHORIZED errors in tool results | Either LBM_API_KEY is wrong/expired/typo’d, or your account is on the free plan (API/MCP requires a paid plan or Pay-as-you-go) | Re-copy the key from https://llmbrandmonitor.com/profile; if it still fails, activate a paid plan or Pay-as-you-go at https://llmbrandmonitor.com/pricing. Restart the client after either change. |
FORBIDDEN | The project is archived, your account is blocked, or you hit a plan-level limit | Unarchive the project, contact support, or upgrade the plan at https://llmbrandmonitor.com/pricing. |
INSUFFICIENT_CREDITS | Your paid plan ran out of credits | Top up at https://llmbrandmonitor.com/pricing. |
RATE_LIMITED | Too many requests in a short window | Wait a few seconds and retry; the assistant will usually do this automatically. |
| ChatGPT/Claude Web shows “Failed to connect” after OAuth | Cookies blocked, or you cancelled the consent screen | Re-add the connector and complete the consent flow without closing the browser tab. |
| Claude Desktop doesn’t show LBM tools after editing config | App wasn’t fully quit, or JSON has a syntax error | Validate the JSON (e.g. jq . claude_desktop_config.json), fully quit Claude Desktop, relaunch. |
lbm_run_scan keeps asking for confirmation | This is intentional — the tool is marked destructiveHint: true because it spends credits. Confirm in the chat to proceed. | — |
For deeper debugging, run the server manually with the MCP Inspector:
LBM_API_KEY=lbm_your_key_here \
  npx @modelcontextprotocol/inspector \
  npx -y @serpstat/llm-brand-monitor-mcp
The Inspector opens a local web UI where you can list and call tools directly, which makes it easy to tell whether the problem is on the MCP side or in the client.
Need help? Open an issue at https://github.com/SerpstatGlobal/llm-brand-monitor-mcp/issues or contact support via your LBM profile.